Click here to visit ...

Wednesday, July 31, 2013

Designer Spotlight: Kellie DeFries


Crystal Ninja owner and Award-Winning Master Designer Kellie DeFries

leads a team of highly skilled artists in today's best crystallization processes. For years, Kellie has provided her creativity and expertise to the world's best crystallization companiesMany have turned to Kellie for her amazing designs, flawless technique, and world-class customer service. An accomplished artist with exacting standards, Kellie is sets the industry standard for excellence in the use of flatback Swarovski crystals. 

 As the Chief Designer for the US division of Bling-My-Thing, Kellie received her crystallization certification after extensive training in BMT's Berlin studios. BMT is the only company backed by Swarovski in Europe, and Kellie is the only licensed artist for BMT in the United States. She personally takes care of each client, and offers a lifetime guarantee* on all work.

Kellie DeFries is also 1 of only 50 people in the world chosen to be aCreate Your Style Ambassador.


Not content with the tools currently available on the market to pick up Swarovski flatbacks, Kellie invented her own, CrystalKatana. This patent pending product is THE only tool you'll ever need to embellish items with Swarovski stones. Perfect for bedazzling, crystallizing and blinging out everything in site. 


Kellie has also put together a professional glue kit that contains all her favourite glue and glue syringes. It even comes with a logo glue pad!

BeadFX is pleased to offer both the CrystalKatana and Kellie's professional glue kit for sale. 

Be sure to check out www.crystalninja.com to see more of Kellie's amazing work and videos of her in action. 

Tuesday, July 30, 2013

Getting to Know...Cindy Goldrick

If you've taken a class with Cindy Goldrick you know the enthusiastic and creative dynamo that she is! Creativity was highly regarded in Cindy's family. "The women around me, aunts, grammas, neighbours, were crafters out of necessity and love, so I was always making potholders on lap looms, corking, making my own Barbie dresses, weaving bracelets from coloured telephone wire. My dad was a painter in oils and water, in his precious spare time, so I also like to draw and paint. I remember getting things like rock tumblers and bead weaving looms for Christmas and making my own jewellery to go with my 70s chic maxi dresses and bellbottoms", explains Cindy. 
 
"I loved vintage in my 20s, and spent a lot of time plundering my mom’s and gramma’s costume jewellery, taking it apart and remaking it. After my son was born in the early 90s I needed small, easy projects so I bought earring supplies almost weekly at Arton and made things for friends and family. Then I had a friend who loved cross stitch and I went to classes at CreativFestival, moving into intricate silk on linen pieces. When they required beads, I went to a TBS Fair at the Y(MCA) and was hooked on creating again," she adds.

To learn about her craft, Cindy took classes from local and international instructors and delved into books and magazines. "I grew up around tools, since my dad was a Jack of all Trades and taught me how to use them, including large metalworking tools. I believe that learning a technique opens your mind to a reinterpretation of the artistic motif that informs all of your work," says Cindy. "Mastery of the medium is important, channeling of artistic meaning is essential to creative development."
Cindy's inspiration comes from many sources. "My students inspire, delight and surprise me all of the time. I have always loved the symbol of the vortex and like to incorporate it into my work, if possible. Beautiful lampwork, raku or polymer clay pieces inspire me to design the framework to make them really shine," states Cindy.

"If I learn a new technique I just start playing with it. I like to set creative limitations, such as use only what I have in my stash to go with one new piece, to see what comes out of it. I look at photos of decorative objects on the V&A web site. Mostly I design to teach a technique and I like to create something that will inspire students to learn the technique while applying their own design sensibility. I make things I would love to wear. If someone else likes it, then I’m amazed and honoured and humbled," she adds.

When asked about collecting and recording ideas for future projects, Cindy explains, "I sketch thoughts and have lots of little pieces of papers in the bottom of my purse (!?!) I have a design journal that I decorated with a variety of techniques from resin to bead embroidery to foldforming, and I don’t use it as much as I should . But I rip things out and paste them down in it. I also put sticky notes on pages in magazines and books, then every once in a while go back through mags from a couple of years ago. Sometimes projects I didn’t even notice jump out at me with time and distance.

Cindy's advice to other artists? "Make mistakes," she says. "There’s actually no such thing as a mistake. Everything is a happy accident and a new path to a creative solution and totally unique finished piece."


Upcoming classes lead by Cindy Goldrick:
Wire Kumihimo Beaded Bracelet
Sunday, August 11

11:00am - 1:00pm
French Knitting with Wire & Beads
Sunday, August 11

1:00 - 4:00pm

Cindy also facilitates Open Metal Studio: Metalworking. 
Watch for upcoming dates! 

Monday, July 29, 2013

Inspiration Monday: Ring a Bling Bling


Enjoy!

InspirationFX
Get your creative juices flowing


by: Dwyn Tomlinson

It don't mean a thing if it ain't got that bling ... .

Surely I must have used that before somewhere!


Our new ring bases are just beautiful - with the heft of fine jewelry.  We bought some big sizes too - so you could even design a signet-style ring for your dude. Probably with less Swarovski's than this though!


Because these are made to be quite random (except for the one with the single rivoli) - take the component list as a starting point - rather than a definitive list.

The basic idea is to use the two-part epoxy clay, make a ball, flatten it slightly onto the top of the ring base, and then stick on the stones, and let it cure.


Tips


  • Knead the two pieces of clay together. Roll each piece out in a snake, roll the snakes together, stretch out, fold, roll, etc., until it is all the same colour.
  • Assemble all the stuff you need first. I wish I remembered to do this. I always have to go hunting for something halfway through the project.
  • Use disposable gloves (latex, nitril, whatever) to keep your hands clean and unsticky. Have multiple pairs, and change gloves. Once you have kneaded the clay - your gloves will be covered in the clay - so take them off and put on fresh ones, so that you don't get fingerprints from the gloves all over the ring as you form up and press on the ball of clay.
  • Cut off a piece of each half of the clay - one is the clay and the other is the hardener. Cut two pieces the same size. Eyeballing the size is ok - it doesn't have to be exact. Don't cut from both clay logs with the same tool. Once the hardener gets on the clay - it starts to cure. Wrap the clay back up and put it aside.
  • Make a ball of the clay, and press onto the ring base. I like the higher profile of the pink/gold ring better - the blue/silver one is flatter - but it's your ring - you choose.
  • Start by position one or two larger stones - then fill in around them with the smaller stones. Use the Magical Pick or The Crystal Katana for picking up and positioning the stone.
  • For the Rivoli ring - just put a small ball of clay in the center of the bezel, and push it in a bit, then add the stone and push the clay out to fill the gap. I used a little water on a tiny paint brush to smooth it out around the stone.
  • If you do get a clay-ey fingerprint on the stone, wipe it clean with some water on a cotton swab. 
  • Push the stones down into the clay with the other end of the Crystal Katana, or whatever stick-like thing you have handy. The clay is quite sticky - I'm pleasantly surprised that you don't really need to push the stones in so far that the clay come up over the side. You can see that the square stone in the pink/gold ring is actually overlapping some other crystals - but it is stuck on there just fine.
  • It takes more stones than you would think to cover the sides of the ball of clay.
  • To hold the ring upright while the clay is curing, after you have placed all the stones, slip it over the end of a pair of scissors or pliers, and set it to cure over night. The scissors/pliers hold it upright perfectly. 


Components

Go to our components list for this project and to buy what you need!
Need some help with some of the techniques? Check our tips page.

Friday, July 26, 2013

In the Classroom with Pam

Pam delivered a one, two punch this week with Shooting Stars on Thursday night and a private class in Friday during the day. 

With permission from Kalmbach, Pam taught a project from Anna Elizabeth Draeger's book, Crystal Play. Here are some pics from the class. 


Today she taught a private class focusing on wrapped loops arranged by a woman for her and her two nieces. Did you know that you can request private classes? Well, now you do! Contact Pam at the store and she can set it up for you. Most of our instructors offer one on one classes if you find that's best for you. 

The auntie and nieces were so creative!!! I see a jewellery designer in the making with the youngest one. Here she is posing with her bracelet. It was so fun to stage this shot. 


She used all sorts of the new neon beads in combination with Swarovski butterfly beads. I think I may have to make one of these myself. 


Her sister used the neon spikes and gum balls with black chain and gunmetal head pins. 


Here's what auntie made with cinnabar beads. 

Way to go, Pam!!

You can view all our class offerings on our website. I'm sure you'll find something interesting!

Thursday, July 25, 2013

in 1907 in Yonkers, New York ...

s36671 Vintage Bakelite - 10.5 mm Round - Creamed Corn (1)... Dr. Leo Baekeland turned his mind to the problem of making a replacement for shellac. Up till then, shellac - used to finish furniture - was made from the Lac beetle - and, he reasoned, there had to be a better way. As with many revolutionary inventions - what he came up with was not what he had intended, but instead, was no less than the beginning of a modern revolution in materials - the invention of the first inexpensive, nonflammable, versatile, synthetic resin - or, as we call it today - plastic.

s36674 Vintage Bakelite - 9.5 mm Round - Wild Lime (1)Bakelite - as it was called - the material of a 1,000 uses - changed the world. It's properties of being heat-resistant and non-conductive made it a big hit for industrial use, and war-time shortages furthered it's use to replace hard-to-get materials.

In the late 20's - the American Catalin Corporation took over the patents for Bakelite, and changed up the manufacturing process, and doing so, invented new colours. By the 30's - this new Catalin Bakelite was in use in jewelry making for beads, bangles, earrings and rings.

s36680 Vintage Bakelite - 19 mm Ring - Tortishell (1)Fast forward to the 90's - and a passion for retro and antique items sweeps the nation. Unlike modern plastics, it was often carved into shape instead of being molded - and the classic workmanship, along with the heavy feel, durability (it is as hard as brass), distinctive "clunk" when struck, and age-created patina turns Catalin Bakelite into a hot collectible. The genuine vintage article soars in price - until, at the top of the market - vintage "Philadelphia" style bracelets are selling for $4,000.

Prices have settled back to more reasonable levels now - and although bakelite is still in production s36710 Vintage Bakelite - 4 Hole Cloverleaf Link - Mahogany (1)for some uses (mostly industrial) - recently - a large stash of genuine vintage, genuine Bakelite jewelry components have come to light.

And we have some of it for you! These are the real deal - vintage Bakelite beads, plus some buckle-like things and other assorted parts ... . It's fun to incorporate a bit of history into your new creations, and if you are as geeky as me, as soon as someone asks - you are off on a detailed explanation of why this bead or that is so cool and this is interesting because, ... and so on. Remember, geek is the new chic and it's ok to actually do that now!

Plus - I think it looks awesome with leather!

s36458 Two Part Epoxy Clay - [100 grams] Ceralun Ceramic Epoxy Composite - Pearl Silk (Pack)If Bakelite is something old - then on the "something new" front - we have some two-part epoxy clay. Hah - you might scoff - that's not new! Fair enough - but this is Swarovski's own house-brand of epoxy clay. This is the clay that is used to hold stones in the Swarovski-covered items like the Euro-style charm beads and other jewelry items.

It is not packaged in a charming, consumer-friendly package, with optional extras and detailed instructions and suggested projects. What it is, however, is fabulous. The colours, while limited, are gorgeous, and beautifully complement Swarovski's stones. I have personally tried the Gold and found it to be a very pleasing match to brass and gold metal, and the silver as well. I wouldn't say that they exactly match the colour of the metal - but they work nicely with it. It has a bit of a shimmer to it, as if something sparkly is already mixed into the clay - and in some colours - the resin and the hardener are two different colours, instead of the colour + grey that many of the other epoxy clays are.

So - if you have tried other epoxy clays - I recommend giving this one a try. Ceralun Ceramic Epoxy Composite.
 
If you have not tried an epoxy clay before - there is no particular reason not to start with this one. Cut off an equal amount from each "log" of the clay and hardener. Knead the two pieces together (I suggest wearing gloves, i.e. latex or natril gloves) until they are evenly combined - takes about 5 minutes. It is inherently sticky - so you can s36774 Findings - Size 8 Flat Circle Cast Ring - Goldplated (1)mold it, and stick it onto a base or background, and then embellish by pressing crystals, beads, or what have you into the surface. You have about 60 minutes before it is too hard to do stick anything to. Then let it cure for about 24 hours. That's all there is to it - no firing, no nasty smells, no messy clean up.

s36754 Findings - Size 12 Bezel Ring - Silverplated (1)Oh, and I guess you'll be wanted some sort of base to actually stick this stuff to. How about a ring? Like these awesome cast, sized rings. Brass and Silver-tone - hefty and solid-feeling. These rings are handsome and just plain yummy! In two styles and sizes from 6 to 13!

s36746 Findings - Size 8.5 Channel Bangle - Silver (1)If a bangle bracelet is what floats your boat instead - we have these great, new channel bangle bracelets.

Find these and other clay-able bases here!


And finally, if that was not enough wonder and awe for you, we are pleased to present you with ... drumroll please ... Dark Neon. Faster than a speeding puppy, more powerful than a bowl of prunes, able to thread bead-needles in a single pass - it's Dark Neon.

s36902 Glass Beads - 4 mm Round - Dark Neon Mix (strand)No - seriously - if Neon colours were this summer's thing - and I think they were more of a fling than a thing - then hot to trot for fall are these stunning Jewel Tone Dark Neon colours. Four electric shades that easy to be seduced by - Vivacious Purple, Emerald, Mykonos Blue and Acai. If you can't decide, you can alway get the mix!

Well, that about wraps it up for this week. Remember to have fun and play with your beads!

Wednesday, July 24, 2013

Designer Spotlight: Sabine Lippert


Sabine Lippert teaches beading workshops in Germany, England, and the United States, as well as at Creativa (a huge German trade show). She is the author of 2009's Das Perlenkochbuch (The Bead Cookbook), 2012's Sabine Lippert's Beaded Fantasies and she maintains an active and popular blog, on which she posts images of new beaded jewelry designs almost daily. Lippert also is a CREATE YOUR STYLE with Swarovski Elements Ambassador. She lives in Bonn, Germany.


I am absolutely in love with Sabine's work. She is constantly experimenting with new bead shapes and even invented one when she could not find exactly what she wanted. Sabine designed the new Rizo bead which is taken the bead world by storm. They are selling like hotcakes in the store. Click here to see out current inventory of them.


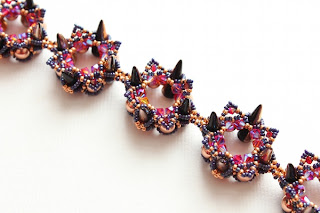
What I really wanted to share with you is the innovative way that Sabine uses spike beads. She has six patterns available for purchase on her website, but I thought I'd share three with you.

Prickly Triangles


Here the Spikes are in a triangle shape, building the base of a sparkling rivoli. The Triangles can be connected to a beautiful bracelet or simply be used as a little pendant. The instructions include 13 pages full with detailed drawings, pictures and text.
Required material: Spikes 17x7mm, Rivoli 12mm, double hole beads (e.g. Superduo (TM)), Bicones and firepolished beads 3mm, rocailles (seedbeads) size 11 and 15.
Beading level 2(intermediate)


Northern Star

Northern Star is a twinkling pendant, using the new spikes beads. Rivolis on both sides invite you to  make colorful vraiations. Because of this, the kits include two different rivolis in each pack. The pattern includes 13 pages. As usuall the instructions include multiple drawings and pictures.
Required material: Rivolis 14mm, spikes 7x17mm, bicones 3 and 4mm, round beads 3mm, rocailles size 11 and 15
Beadinglevel 2


Over the Top

A bracelet that catches the eye! The spikes are upright here like little thorns, so be careful! And always be kind with the person who wears the piece! The instructions include 15 pages full of pictures and drawings and detailed step by step instructions.
Required material: Spikes 7x17mm, round beads 6mm, bicones 3 and 4mm, rocailles (seed beads) size 11 and 15
Beading level: 2 (intermediate)

You can download two free patterns from Sabine Lippert's Beaded Fantasies on the Lark website here.

To take a closer look at what spike beads we have available, please click here. We have baby spikes, 17 mm spikes and fat spikes.

If you are on Facebook, please like her page. She so close to 5,000 fans!