Click here to visit ...

Monday, November 30, 2009

Taking Great Photos. Part 14: Cropping to a Specific Size in Photoshop

Now here's a great little tip for using Photoshop - this one was a huge timesaver for me.

Many's the time that you'll want to save your images to a specific size. Used to be, you just needed to save them to a different size - smaller - but now - with lots of sites, like Etsy, for instance, saying "your images should be 1000 pixels across, no less than 400 across, and preferably, the image should be square" - now you have a lot more specific criteria to meet.

In Photoshop - you can force the size of the image when you crop. If you want it to be 400 pixels across by 400 pixels high - you can make that happen. If you just want to ensure that your image is 1000 pixels wide and you don't care about the height - you can do that too.

When you select the crop tool, you will see boxes where you can enter the size for the width


Type the size you want in the boxes for width and height, and use "px" as the abbreviation for pixel ('cause you can do inches, cm, etc., as well - so you need to specify pixels).

Then, when you crop - you will be constrained to a square - in this case, as I specified the same width as the height. Then when you execute the crop - the image will be resized.

With the next picture - the same original image - I picked a smaller area - and again, cropped to the same 500 x 500 size, and so that part of the image was made to be a 500 x 500 pixel image too. You do have to be a little careful with this. If you pick too small a piece of the original image - that is smaller than the size you are cropping to - it will actually be enlarged. Photoshop isn't going to quibble with you about it - but the image quality may suffer.


Here are the two resulting images. You will notice in that case that the second one is not as sharp and nice as the first, as it has been enlarged to 500 x 500, instead of shrunk. Still with me? Whatever portion of the image you pick will be forced to the size you specify - it may get smaller - it may get larger - but it is absolutely going to be the size you said you wanted.


If you just want to constrain one dimension - leave the other box blank.


Hope you find that little tip useful - I know it was a huge help for me!

Sunday, November 29, 2009

Cute Food

There is officially now, a blog for everything. This one is about cute food - Epicute.com. There are a lot of cupcakes. As skeptical as I may sound - the nutella bunny sandwich bento box is weirdly compelling. Can you imagine someone making something like that for you?

Which led me to Adventures in Bento-making. For the foodies. You know who you are.

Saturday, November 28, 2009

Sneak Peek at Next Week

Hopefully - you are having a quick look at this on Saturday morning - before you head on down to check out our amazing Lampworker's Trunk show. Handmade glass beads will be available for sale, and you can meet the artists, talk to them, see demos - and snack on some brownies too.

s22024 Stone Beads - 6 mm Round - Kambaba Jasper (strand)What's coming up next week? Stone beads! Stone of the month will be Kambaba Jasper - but there are lots more beside - like these amethyst nuggets.s22213 Stone Beads - 10 x 7 mm Faceted Nugget - Amethyst (strand)

Friday, November 27, 2009

Urban Dictionary

It's been a while (snort!) since my punk rock days of the mid 80's. Frankly, I always thought I was pretty cool (that word should date me right there). Lately, with my kids in school I've been coming across sayings, expressions, and words that I have no idea what on earth they mean. - Enter the Urban Dictionary

I particularly like the random feature where you can just surf around for random current sayings - some are interesting, some I really didn't need to know ;-) - A word to the wise, some defs are just plain offensive....

Thursday, November 26, 2009

Trunk Show! - Getting ready again :-)


Last week we had our first ever Heavy Metal trunk show, and this Saturday we're back with our very popular Lampworkers Trunk Show. We'll have demos all day long - boro, beads, sculpture - find out about classes, eat yummy goodies, and of course - the best part - Buy fabulous beads from a variety of our lampworkers. There is something for everyone in all price ranges.

Trunk show runs Saturday from 10am to 5pm. We hope to see you at beadFX!

Wednesday, November 25, 2009

Tuesday, November 24, 2009

New Classes Just in Time for the Holidays

Whatever holiday you celebrate at this time of the year we have a class for you! If you are looking for gift ideas or something for a New Year's Eve party you will surely find the inspiration in one of the many classes coming up this December!

This week we have Keith Wong's third class Swizzle Sticks and Olive Picks! These are totally adorable and make great gifts or accessories! This class runs from 6 to 9pm on Wednesday November 25th. This is a beginner class.


Thursday is week 2 of Cindy Vroom's Basic Beading Stitching 101. Focus for this weeks class is Netting. This is a beginner class.


Saturday November 28th is our Lampwork Trunk Show. Demo's will be on going all day, come and have a snack and meet some of the local lamp workers, as well as, our instructors!

Sunday November 29th from 12 to 4pm we have Keith's 4th class-Blown Ornaments! These are absolutely beautiful when they are done!


We also have a great class with Heather Bell-Denison on Sunday November 29th-Getting Hitched...Metal Clay Clasps. This is an intermediate level class and it runs from 10 to 5pm.


Monday November 30th is Robert Burton's last class of the year--Wire Working and Wrapping 101. This is a 3 week class that runs from 6 to 9pm each Monday night.


December is looking great as well!

Tuesday December 1st is Charmed I'm Sure with Heather Bell-Denison from 10 to 5pm.


We have a new class with Maria Rypan on Thursday December 3rd from 2 to 4pm 3D Snowflake Fanwheels. These are absolutely beautiful pieces and Maria is a fantastic instructor and you are guaranteed to have a blast. This is a beginner class.
On Thursday December 3rd in the evening from 6:30 to 8:30 we have week 3 of Cindy Vrooms class Basic Bead Stitching 101, this week will be focusing on right angle weave.


Saturday December 5th is Marilyn Gardiner's last two classes until April. From 10 to 12:30pm we have Earrings and Pendants.

And from 1:30 to 4:30 is her Japanese Stepping Stones Bracelet. This is a beginner class.

December 5th and 6th Amy Waldman-Smith has a 2 day 8 hour Learn to Make Glass Bead weekend.
Sunday December 6th Heather Bell-Denison has a new class, Textured Rings CopperClay Bracelet. This class is intended for students who have some metal clay knowledge but those wishing to take the class who do not have metal clay experience can do so but will likely focus on simpler projects.

Tuesday December 8th Angela Peace is here with An Introduction to Chinese Knotting from 2 to 5pm.

Thursday December 10th is week 4 of Cindy Vroom's Basic Bead Stitching 101. Cindy is focusing on the Herringbone Stitch in the this class.


Saturday December 12th is the beautiful Dancing Dahlia Brooch with Nadine Foskin from 10 to 12pm.

Sunday December 13th from 12 to 10:30 is another new class with Heather Bell-Denison, Let's Do It Together! This is a parent and child class aimed at making a couple of pendants together and is NOT an introduction to the use of metal clay. Children should be at least 10 years old or older.

Tuesday December 15th is a Metal Clay Play Day from 11 to 6.

Thursday December 17th is Snake and Phoenix Knot Cords with Angela Peace from 6 to 9pm.


Sunday December 20th is Beyond the Button Knot with Angela Peace from 1 to 4pm. Participants need to be able to tie a double and a single button knot. Snake or Phoenix knot knowledge is useful, but not essential for this course.


Happy Hour Torching is on as usual this week, buy one hour get one free from 5 to 9pm.

Happy Beading and hope to see you here this weekend!

Monday, November 23, 2009

Taking Great Photos. Part 13: The Cream of the Cropping

Let's talk about cropping. For the moment - let's ignore the size of the image - we'll get to that soon - and just talk about whacking off the chunks of the picture that detract or distract. Think of it as the electronic equivalent of taking a pair of scissors and slicing off the side of the picture with that no-goodnik ex-brother-in-law that dumped your sister and left her with two kids to raise all by herself - may he rot in hell - on it.

Most of the photography that we are doing is, as we discussed earlier, macro photography. With macro photography - you don't usually have the option to zoom in and out to change the composition - and so you move yourself in and out from the subject to crop. But - that can be hard on the back - and so often - you shoot everything from the same distance. Now you just want to trim off the excess so that you don't have your subject lost, floating in a sea of grey.

You might also have a picture that you really like because the angle was great, the focus perfect, etc., but you also captured the edge of the stage, or your fingers or some such. Or - it was the only one you took before you gave the item away. Pfui on you for ignoring my advice about that! ;-)

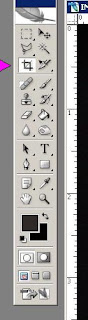
To crop in PhotoShop - look for this tool - the crop tool. Every picture editing program will have a way to crop the image - or it's not worth hard drive space.

Click in the top left of where you want to trim to, and then drag to the bottom right, and release. You will have a marquee bounding box (the marching-ants line around the image) - and the part that will be trimmed away will be greyed out and look darker. You can adjust those edges - move your cursor over one of the little hollow boxes on the marquee line and it will change to a double-headed arrow. Click and drag to adjust the line location. When you like what you have - double click inside the box and it will crop. (If you want to cancel the operation without cropping - press the "Esc" - escape - key.) Now - save your image. You are working with a copy of your original, right?

Let's look at some examples.

Here we have one of my pony beads - you can see a reflection in the top right of the next one, waiting to be photo'd, the edge of the stage in the top and bottom left, and - oh nice! - a reflection of me taking the picture. Very professional.


So - trimming the edges away - those distractions go away and now you have a picture that focuses on the bead - and even though you can see the photographer's reflection - it is now merely a colorful blur that looks like it might have been purposeful.

Here we have practically the same scenario - the next bead peeking in from the top right.


Crop, double-click and voila - distraction gone!

Now here we have a grouping of ponies - and you can see that the overall composition isn't bad - no obvious distractions, but could be a little tighter - less excess space around them.

In the second version - the image can been cropped, but cropped badly - cutting up close to the noses and leaving excess space on the right.

In the third version - the cropping is better, close on the right and leaving more room on the nose side of the picture.


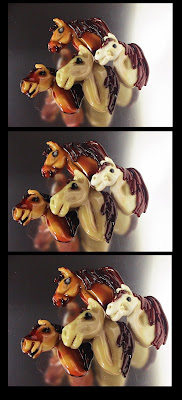
I like to think of leaving some "breathing room" or "room to move" in the image. Generally - here in the western world, we are taught to read from left to right, and so we read our images from the left to the right as an extension of that. These pony beads are made to be read from the left to the right (when you view them) as the face will be on the left and that is the important part.

If they were made to face the other way - you would be looking at the mane first - not the most significant part of the face. So you see the nose - your eye travels up to the pony's eyes, moves right, looks at the mane, follows the curve of the mane down and keeps going around that curve back up to the nose and around again to the eyes for another look. Very clever, yes?

But when you look at the second version (here it is again) - it jangles - because those poor ponies are jammed right up against the edge of the image. They aren't actually touching it - but it feels wrong because they are so close and there is so much space behind. So while I would NORMALLY put the extra space on the right - if I thought a picture needed it - this is the exception that proves the rule. The third version - with the extra space on the left - at the nose side - looks better.

Once you start cropping pictures - you have to starting thinking about composition - which leads us to the story you are telling - what do you want to say? - and who are you saying it too?

Let's look at another. This is the original, uncropped picture. Not inherently awful - but too much extra space around the necklace.

That's a slate roofing tile for the background - in case you were wondering. It makes a lovely background.

So this version is cropped to show the entire item. Very appropriate for showing the entire necklace and showing the focal bead, the strands and the clasp.

This version is cropped tighter - you can no longer see the entire image - but you can infer the rest. This puts the emphasis on the focal bead and the colour of the beaded strands. This piques the interest, and would work well as part of a series of photos of the item in question.


Don't be afraid to crop your image so tight that some of it bleeds off the side of the image - especially if you are presenting multiple photos - so that overall - your viewer gets to see the entire piece.

This image was shot close to show the beautiful patterning on the surface of the bead.

But by trimming it even closer, and eliminating the extra space on the right - it does that even better now.


One more example. A wave bead on a slate tile. Lots of extra space.

Cropped tight - really shows off the bead.

Cropped a little looser - with extra space of the right - seems to have a little more context - perhaps evokes waves crashing on rock just a little. Neither cropping option is wrong - just more appropriate in some situations than others.

I tend to deliberatly leave space around the image when I shoot it so that I have options in cropping when it comes time to use the image.

Composition can be a difficult topic to get your head around it you don't have a natural flair for it. It is quite learn-able though - it's not a dark art. Try and pay attention to the order you see things in an image. Where does your eye go - from where to where to where? Or do you just get confused and can't figure out what to look at first? That would be an example of poor composition. Do you overlook some important detail? Perhaps changing the cropping will change that?

Do try different cropping options with your images to get a feel for what works. Make multiple copies of your images and try cropping them to different extremes. Try long skinny pictures, try cutting off one side. Try leaving a lot of space on the top or bottom. Then compare the results and see what sort-of works and what doesn't - and then go from there.

Often, you also have to work within the constraints of where you are using the image - i.e. a website that only uses square images. Next week - I'll show you a neat trick in Photoshop for handling that particular dilemma.

Sunday, November 22, 2009

Anti-Eye-Candy

So what is the opposite of eye candy? Eye-lemons? Whatever it is - it's on this site. You are all familiar with Etsy.com - the home of handmade crafts - well - this is regretsy.com - home of ... well, just go look for yourself.

Saturday, November 21, 2009

Sneak Peek at Next Week

34761911062001 Crystallized - Swarovski Elements Pendant - 48 mm Divine Rock (6191) - Crystal Silver Shadow (1)Hang onto your wallets - new stuff from Swarovski Crystalized! Divine Rocks and Lochrose. 10735001001001 Crystallized - Swarovski Elements - Sew-on Stone/Pendular - 9 x 5.5 mm Lochrose (3500) - Crystal Golden Shadow (1)

Friday, November 20, 2009

Trunk Show! -Getting ready

We're busy getting ready for tomorrow's Heavy Metal Trunk Show - I'll be doing demonstrations of fine silver fusing, copper, bronze, and silver clay, and birdsnest rings (those are always popular) The birdsnest rings make a fabulous gift for someone, and only take a few minutes to make. They're pretty addictive too! Heather and I will be doing demonstrations throughout the day. Feel free to come by to pick our collective brains if you have any questions about working with metal clay! Our resident goldsmith Suzanne Cruden will also be there. Want to know more about fine jewelry making? - She's the one to ask.

That's it for today - I have to get back to preparing for the show :-)

Thursday, November 19, 2009

A quickie


Yes, another one this week - it's one of those weeks, and I'll fall down exhausted by the times I'm done. - Anyhoo.... Last night with the update you may have noticed that we just got in Cynthia Thornton's book - Enchanted Adornments. I bought mine a while ago before we carried it. Run, don't walk to get your copy. Follow along with her mythical women who get uniquely designed jewelry just for them - If you're a mixed media artist especially - you'll love this!

Wednesday, November 18, 2009

Heavy Metal Trunk Show


A first for us - you may be familiar with our lampwork bead trunk shows. They're a huge amount of fun for us, and our lampworkers. We get to hand out - show off our new beads, eat, sell, demo - fun for all!

We've decided to try out another spin on this with a 'heavy metal' trunk show. We have wire workers, metal clay artists, chainmailers, and a few other types of metal heads I might be missing. Heather and I will be there all day demonstrating metal clay, including working with bronze and copper! I may be convinced to give some demos on fine silver fusing too ;-)

If you get a chance, do pop by this Saturday to check out the goods!