Click here to visit ...

Showing posts with label Alcohol Inks. Show all posts

Wednesday, September 21, 2016

Dirty is, as dirty does!

I’ve started experimenting with “dirty pours”, and I think that I’m in love!!!! They're so much fun, that I’m sure it will become yet another fascinating addiction for me (heh, heh, and perhaps for a few others)! !
As I mentioned in an earlier blog post, you could use either resin or acrylic pouring medium, as the base of your pours. I used pouring medium this week, but I do promise to work with Ice Resin next time. The small measuring cups were overkill, as no measuring was required with the pouring medium, but you will need to remember to use them when working with resin!
If you ask me how I did this, I’ll need to give you a sketchy answer, as this is definitely not a scientific process. I’ve found that it’s impossible to duplicate pours, even when working with the same batch of paint. I splash in a little pouring medium, then add dollops, or drops of paint and ink. For the purpose of these experiments, I used acrylic craft paint, acrylic ink, high flow acrylic, and alcohol inks, but not all in the same batch. The pouring medium goes first, then paints and inks, from heaviest/thickest, to lightest/most liquid (on the top). Alcohol inks, if you’re using them in the mix, go in last. A quick swish with a toothpick (you do not want to mix thoroughly), then you’re ready to pour. I chose to use four different substrates for this first go! Domino game pieces, glass nuggets (thanks Malliga), laminate countertop samples (courtesy of my local home improvement store), and a couple of little wooden hearts (thanks Pam). No real reason for choosing them, other than that’s what I had on hand. I intend to pour my next series, onto metal blanks and glass tiles (available at BeadFX).
My process still needs refinement, but I started by pouring a line of the paint mixture, in the middle of my substrate. It’s fairly thick, so it was easy to spread to the edges, via my very sophisticated, toothpick tool! If you try this on your own, be careful not to over pour, as you will make quite a mess, and end up with a puddle of paint, flowing over the edges. In a true “dirty pour”, you pick up the edges, and rock the substrate back and forth, until you're happy with the results. I didn’t have gloves, so I decided to leave that technique for another day. You’ll notice from the photos (each represents one batch of “dirty pour” paint), that the colouring for each batch is the same, but the patterning is completely different. The layering of the different densities of paint, as it comes out of the pour, is like magic! You can also do another pour, on top of one that you weren’t entirely happy with, but let it dry first. Take the dark purple set, for example. They looked okay in the photo, but I decided that I really didn't like the results, so I mixed up a lighter batch, and changed the look entirely (see below). Plus I was able to add an extra piece, as a bonus! I also tried splashing on alcohol inks, after the pour, for yet another look. However, you need to hold your breath, and hope for the best, as this causes a drastic change to the look of your pour!!
All of these pieces are destined to be pendants and cabochons. They'll get a top coat of Ice Resin, but I still need to figure out how I’m going to finish the backs and edges. I do have ideas, but would like to try them out first, before revealing all of my secrets. After all, I am participating in the BeadFX, Artisan Trunk Show, on October 2nd! I do promise to take photos, and will show them in a future blog post!
Go forth and be dirty, my friends! My apologies in advance, if I’ve tempted you with a new technique/addiction!!!

Wednesday, September 07, 2016

What the heck is a dirty pour?

You may or may not know this, but one of my leisure activities is to troll the internet for unusual art activities. I belong to several resin and alcohol ink groups, and the latest one I joined, “Let It Flow”, introduced me to the “dirty pour” term. Just like in the old blogging days, one Facebook group leads you to another group, and the cycle is endless. It’s fun, it doesn’t hurt anyone (other than discretionary time), and you are always learning.
What exactly is this strange and wonderful term? It has nothing to do with either bad language, or construction leering! It really is an art term, but perhaps one that has not been associated with jewellery yet. I haven’t actually played with “dirty pours” (except in a very limited sense), but I find it quite fascinating. You take either resin, or acrylic pouring medium (dries clear and somewhat shiny and found at an art supply store), and then layer up various densities of paint dollops (heaviest on the bottom, and lightest on top). A couple of light swirls with a stir stick, and then you pour on your background. When you’re done, you start tipping the substrate, for a wonderful, swirling explosion of colour saturated eye candy! Gloves, masking tape, and table protection, are a very wise investment! Lacing effects and cells (think frothy waves on a beach) can be obtained via various methods, which include some that I’m not comfortable with (at least yet)! Effects are intensified, and bubbles vanquished, via your trusty torch (I’ve heard that a heat gun is also useful). You apparently need to do this at 10 minute intervals, as bubbles are known to be obstinate, and very, very tricky! I’ve heard of bugs and flies, curing along with the resin/paint, so you must be vigilant! Dust motes, cat and dog hair, are not your friends!!! Overturned cardboard boxes, are an acceptable barrier, but don’t forget to check them out for dirt and dust, before setting them over your masterpiece. The above photo is not mine, but rather one I grabbed off Google images, by an artist called Miabella, from Dream Spirit Studios. She has a YouTube out there, that illustrates her process (as it relates to acrylic, not resin). Take a look, if you’re interested in learning a little more.
House paint, fluid acrylics, high flow acrylics, acrylic inks, alcohol inks, Pebeo paints (including Vitrail and Fantasy Prisme and Moon), resin, airbrush medium, and acrylic pouring medium, are all products that I have heard associated with “dirty pours”. I’m not sure, but I believe that the Fantasy line (it’s solvent/oil based) needs to at least partially cure, before pouring resin over it, but then again, these artists seem to be leading edge, and are willing to layer on just about anything! On one group (this one, I think), I heard that you could add alcohol inks to the top of your Fantasy paints, then add heat, to produce the “lacing effect”. Well of course I had to try this, but in a much smaller format, on a domino. As I forgot to put the domino on a heatproof surface, I quickly learned that parchment paper is not flame safe....yikes! Good thing I had water nearby! The experiment was not exactly what I would call a success, as a lot of the paint, slid right off the domino, onto the parchment paper. However it did give me an interesting texture, so I will certainly continue the experiments at a later date. If any of you try to do this, please do it outside (or in a very well ventilated area), on a heatproof surface, and have something close, that could quench the flames. My little inferno was very small, and I was able to put it out fast! These fumes are probably toxic, so a good protective fume mask (not just a flimsy dust one), is an absolute must! The photo showing above, is said domino, after it cured for 72 hours, and then was trimmed. The ceramic tile in the background, was painted with alcohol inks and fire (but not at the same time as the domino).
If you’re wondering where I’m going with this, it’s that I intend to continue experimenting with “dirty pours” in a much smaller format. Mainly to see if I'd be able to scale down the process, and adapt it for jewellery purposes. At the very least, I'd like to be able make something interesting, out of the colourful runoff. Think Fordite, on a much smaller scale (see above)! If you’re looking for me, during the fall/winter, you’ll probably find me in mad scientist mode, up to my elbows in resin, ink, and paint!!

Wednesday, August 24, 2016

A concrete idea!

Well, I couldn’t let Dwyn have all the fun, could I? I was the second person in the store, to nab a container of Create Recklessly, Artist’s Concrete, and I need to confess, that I’ve already used up half of my supply. This stuff is seriously fun to work with, and I’m just getting started!
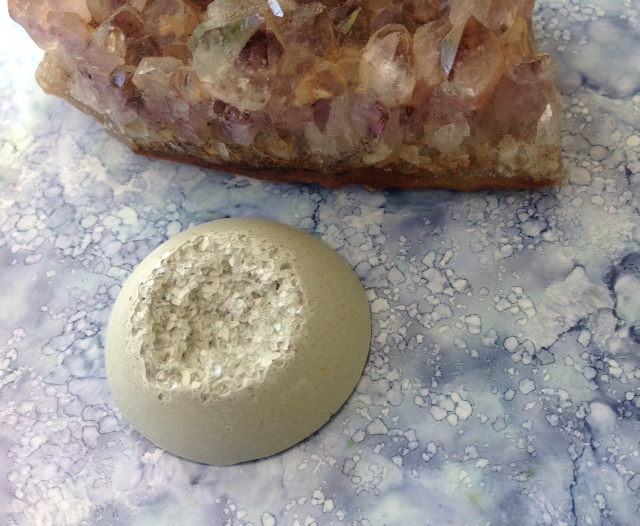
Many of you know that I love to experiment, so instead of showing you my first efforts, I’ll show you a few of my final ones (okay, I’ll show you all of them, but I like these the best). The idea is not my own, as I did spot a YouTube video, that showcased this technique. All you do is dump some glass glitter (the coarser the better) in the bottom of a mold, and then pour the concrete over top. The concrete flows around, but doesn’t seep all the way through the pile of glitter. When the concrete is dry (wait for at least an hour), take it out of the mold, and then shake off any excess glitter, for a fabulous hollow, faux druzy effect!! It’s better to use a clean mold, as the concrete will absorb any dust, dirt, or leftover pigments.
I've heard that you could use Alcohol Inks (AI) to colour the concrete, but that you should be careful with the quantities used (of course, they didn’t provide the recipe!). I erred on the side of caution, and only used four drops of colour. Either the colour I chose (Adirondack “Pool”) wasn’t strong enough, or I should have used more, as the AI only lightly tinted the concrete (the second photo in the post is the one with the AI). However, I’m not too worried, as there’s plenty of time for further experiments. I didn't use any pigments with the heart mold, but don't you just love it? Even better, it was a freebie, sent with an on-line purchase.
By this time, I was getting tired of glitter (not really, but for the sake of science, I had to try something else), so I tried mica flakes, and then some tiny rocks (that I had purchased for my October, Bead Embroidered Pendant class). I’m not that thrilled with the blue mica, but I absolutely love the rocks!! The cabochon reminds me of a dragon’s egg, and now I need to buy a teeny, little dragon, to see if I can play mommy!
Next I dusted mica powders in the bottom of a couple of molds, and then poured in the concrete. The coverage on the face cabochon turned out a little spotty, but I do love the starfish, seashells and button! The white shell is natural, and is from the first batch of concrete that I poured.
Next up, open backed bezels! I dug into my stash (for a couple of them) and added some packing tape to the backs (making sure that I burnished it well, to ensure complete contact with the metal). These bezels are pretty thin, so I carefully dripped in a little concrete (with a toothpick), spread it out to the edges, then lightly dusted on a bit of leftover glass glitter. I rather like the effect, don’t you?
Back to experimenting! Rochelle had gifted me some rusty road kill (random bits, picked up at the side of the road), and I thought that one of the larger washers would be perfect in the bezel. I added it right after the pour, and to my surprise (silly me!), it started to sink!!!! Oh no, what should I do? Of course, I added another smaller washer, and this time, right on top of the first. Perhaps not a perfect solution, because the proportions are off, but I haven’t given up on the piece! I still have the option to either glue, or draw something on the concrete. It's interesting to note, that the rust has started leaching out into the concrete. I'm not really surprised, but it's something I hadn't considered.
These faces illustrate the fabulous detail you can get with this product. I used a bit of the plum pigment (Create Recklessly) in one of them, but feel that I should have actually added more. The bumpy, organic piece is from a mold I made from a Lychee Nut shell, that Pam gave me. Now for the downside - An imperfect mold = an imperfect piece, so don’t be surprised if some of your pieces don’t come out perfectly. Just remember to throw out those molds, and start again!
As you can see, I’m quite excited by this product. My ideas seem to multiply like rabbits, and I plan to continue to explore my concrete ideas, in a concrete sense! Will there be an Artist's Concrete workshop in the future? Keep tuned, but first I feel the need to play!

Wednesday, August 10, 2016

What's on my bead mat - August edition!

What happened to summer? It’s certainly been hot and steamy, but how long will it last? Has anyone felt like doing any serious work? I’ve been lazing about, focusing on finishing off a few things, working on class samples, and dreaming up a few “Inspirations” for the store.
The last time I tried to coat two of my larger alcohol ink projects in Ice Resin (a ceramic tile, and a small plate), I was quite disappointed. I followed all of the rules, but didn’t get complete coverage on my first try (once dry, the surface was pitted, and uneven). As I make a habit of never giving up, I bugged a few more people, sanded the surfaces lightly, then reapplied the resin. Success! Well, I still have one small area that needs a little TLC, but I think I figured it out, with a little help from my friends. Let the resin thicken before applying, and inspect it carefully (get right down to eye level). I also ran my small butane torch over the surface lightly, to smooth things out, and get rid of any bubbles. Not for the faint of heart, research it carefully, and make sure you take all necessary safety precautions. I'm definitely not responsible if you choose to experiment! Unless, of course, you are wildly successful!! By the way, Ice Resin makes the alcohol inks, absolutely pop! Seriously, they glow!! I'll be discussing techniques, and a variety of finishes, in my upcoming August workshop.
I love turquoise and red, and you’ll see both those colours turn up in my next series of “Inspirations” (two so far, but no write up’s yet). Rochelle wouldn’t be happy if I gave you a sneak peek (and I wouldn’t like to make her unhappy! Giggle!), but if you’d like a hint, they include wire, and Turquoise Picasso beads, mixed in with a couple of different types of red Czech beads. Some of my leftovers are showing on the mat, joined by a couple of leaves, that Marg challenged me to transform. Hmm, I wonder what I will do? I’m not sure yet, but I promise to share, when I figure it all out!
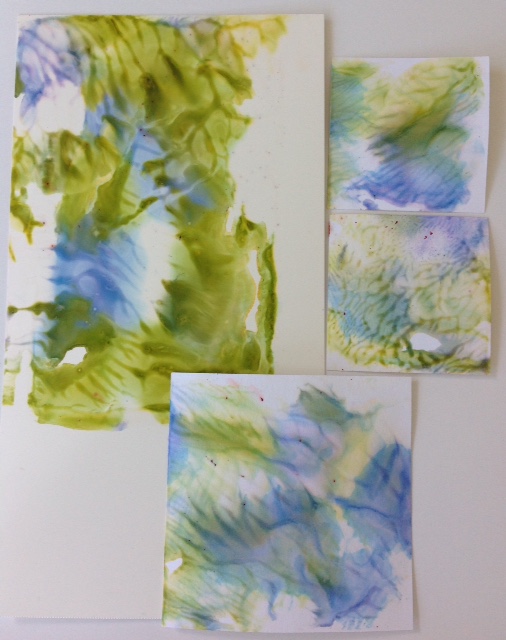
I’ve been experimenting with altering leather, and am pleasantly surprised with the results. You can’t see much here, but I will reveal the project after it’s finished. Will it turn into a workshop, another “Inspiration”, or both? Only time will tell.
Most of you already know, that I’ve been working on a needle felted, embroidered, and beaded book cover. Well, the embellishment is finished, so I thought that it would be fun, to include an open shot of the back and front, as well as a closed photo of the front. I'm happy with my progress, but now I need to cover up the back with something interesting, and then add an edging (probably beaded), before turning it into an actual book. The non-conventional shape will make it a little challenging, but that's the way I like it!!
The final photo is a sample I’m working on for an upcoming class. Not quite finished yet, but close! I’ve already made a larger version, so I’m calling this a tiny tidbit! Isn't that the cutest little starfish? Lessons learned with this one, include not adding three fragile shells, at the beginning of the project. Do you notice that there's only one remaining? Gulp! I think that I should have added a thin layer of resin, to protect them. Fingers crossed, that the last one survives!!!
Well, I guess that I’ve been working on more than I thought! Heat brings on a certain amount of lethargy, but apparently it can also bring creativity! I hope that you’re staying as cool as possible, and if not working on, at least planning some fabulous future projects! I know that I am!!

Wednesday, August 03, 2016

The sky's the limit!

Did you ever look at a blank page, and wonder what the heck you were going to write on it? Creativity seemed to leave the building, as your brain froze in terror! Think back to the teenage years? Remember the horror? Similar things can happen, when you’re looking at a pile of beads, or other supplies like empty bezels, white dominos, glass tiles, or metal pieces. What to do, what to do?
The beads can be shuffled around, until you find something pleasing to the eye, but what about the rest of those blank promises? Clues, I know clues! Lots and lots of clues! Wouldn’t that help to fan your sparks of creativity?
Colour and texture are obvious, but how will you use them, and what form will they take? It certainly helps if you’re a magpie like me, and collect all sorts of bits and pieces. But if not, it’s never too late to start your own creativity box &/or idea file! Flip through your magazines, and cut or tear out anything that interest you! Old letters, photographs (copies, not originals), ledger paper, handwritten notes, cancelled stamps, security envelopes, children’s drawings, free or purchased images, commercial papers, fancy napkins, and colouring book pages, should all be fodder for your creativity! Focus on colour, shapes, textures, fonts, and just about anything else! Build yourself a nice, fat, file, and then take some time to sit down and play with your papers! You’ll be amazed at how soon the juices start flowing!
If the muse agrees, create a collage! Then audition parts of your collage, as a background for your piece (perhaps in a bezel, or even a domino). Do you like it? What if you decided to tart the collage up a little with some paint? How about framing it with a narrow layer of Iced Enamels, glitter, or even another collage? What if you included a charm, bead, or some type of natural element? Or how about shrinking a photograph to size? Do you see where I’m going? I’ve started you off with a basic background, and then I’m leading you into building a composition, by suggesting other possible elements.
But wait! You don’t need to limit yourself to paper! How about building a metal or fabric collage? You could even make a stitched fabric & paper collage! The extra texture would be fabulous and the principles are the same! As a self-professed, mixed up media person, I certainly wouldn’t complain! But then again, what about painting or printing (monoprinting, such as Gelli printing) your own backgrounds? Try it with either acrylic paints, watercolour, inks, or even alcohol inks. That would be totally cool and creative!
Play, experiment, and build your composition! Conquer the freeze, open your mind, and explore the possibilities. The skies will open up, your muse will be happy, and creativity will bloom!

Wednesday, July 27, 2016

Alcohol + Ink = Art!

Sorry to disappoint you, but when I mention Alcohol Inks (AI), it's all about art, and absolutely nothing to do with drinking alcohol! Of course, when you’re working with AI, it doesn’t hurt to have a wee dram of something comforting, but it’s certainly not mandatory, as these inks are so much fun!
Alcohol Inks are tiny little bottles of sheer, saturated colour! I’ve used them on various non-porous surfaces (after all, that’s what they were designed for), in resin, polymer and epoxy clays (both before and after the product cures). My all time favourite slick surface, is ceramic tile, but they can also be used on marble, various metals, glass, hard plastic, game pieces, old CD’s, washers and Yupo paper (a synthetic polypropylene paper with a slick surface). I’ve cut open pop cans (a.k.a., soda cans), and used the inside surface. I admit that I haven’t tried transparencies yet, but I see no reason why it wouldn’t work. I’ve even heard of people adding a coat of gesso to artist canvas, and then using the inks on those surfaces. Glossy photo paper is also an option (but falls in the trial and error category), but another that I haven’t tried. I've heard that some people, actually use the back of the paper, and that not all papers are equal. Who knew?
There are two main brands on the market, one from Ranger called Adirondack, and the Jacquard Pinata colours. If that’s not enough, you can supplement your inks, with a whole slew of markers (and re-inkers for some of them) including Copic, Spectrum Noir, Prismacolour, and even the lowly Sharpie. I know that there are more out there, but none that I’ve seen locally!
Now what does this have to do with jewellery and art, you say? I may be prejudiced, but quite a lot, I think. Although these inks are fast drying, and definitely have a mind of their own, they allow you to work at various levels of expertise, and on many different surfaces. At an introductory level, they provide a quick colour fix, make you look like an expert, and are very easy to use! Add paper collage &/or embellishments, and you have a mini-piece-of-art (for example, an altered domino, or mini-tile). At a more advanced level, harnessing the ink properties, presents more of a challenge. You might consider adding markers (including permanent ones), resists, paintbrushes, other paints/resin/ink, canned air, etc., to add more depth to your work. Add chain, leather, bead weaving or stringing, and your Altered Dominos, metal and glass pendants, are suitable for art jewellery pieces. Work in a larger format, and you have art to frame! There are plenty of resources for AI aficionados! BeadFX classes, You-Tube and Facebook are only a few. I warn you, that the inks are pretty stinky, so make sure that you take the necessary safety precautions. Work in a well-ventilated room, and if necessary (especially if you have breathing difficulties), make sure that you use a respirator! As the inks are not U.V. resistant, you will need to add a spray or two, to keep them from fading over time. But that being said, try not to spill them, or get them on your hands. I dare you!
I love my Alcohol Inks, and I also love addicting (err, teaching) others how to use them! There’s nothing else that compares, to that quick jolt of colour!! Abstract or representational, it doesn't really matter....you're making art, relieving your stress, and enjoying the heck out of yourself, along the way!!!

Wednesday, December 23, 2015

Reflections on an exploding stash!

Santa Baby, I've been a very bad girl this year!! I purchased tons of stuff, with absolutely no idea, what I was going to make! Sure, I whipped up some class samples, and made an Inspiration or two, but did I really need all of those pearls? I ask you, would you?
Then, let's chat about the paint I purchased. Yes, I absolutely needed the Pebeo Fantasy paints, Adirondack, Alcohol Inks, Ice Resin, Iced Enamels, Gilders Paste, Mica Powders, and Spectrum Noir markers, for workshops I was teaching, but did I need so darned many of them? Not to mention seed beads, shaped beads, stones, buttons, bezels, rusty objects, found items, and perhaps even a cabochon or two. Should I mention the findings, threads and tools? It doesn't matter, because they make me happy, and if that means that Santa is not going to slide down the chimney this year, then so be it!
Now, how about talking about the stash from my pre-beading life, when I fancied myself a fibre artist? I own piles, and piles of thread, paint, paper, embroidery floss, and even a bunch of yarn (despite the fact, that I don't knit). It's not like it suddenly disappears, in a puff of smoke, when I head off in a new direction! It's still there, and it's clogging up my studio, and if the truth be told, my living and dining room, and storage area. When will I ever learn? I'd be embarrassed to show a photo of said studio, so I won't....but believe me, you're not missing anything! Sign me up for hoarders anonymous!
So, in the interest of full disclosure, I've been participating in an international paper swap, for a couple of years. Do I need more paper? No, of course not (except as collage fodder for my altered dominos), but I still signed up for 2016 (if anyone is interested, it's www.paperswap.com). It's a fun way to add some unusual papers to your stash, and meet a bunch of lovely people, along the way. Should I mention the fact, that I also monoprint my own papers (mainly for collage, paper beads, and swaps), via a wonderful tool, called the Gelli Arts, Gelli Printing Plate? You'll need to look them up, because they're not sold in the store (but I do use the printed papers, in several of my workshops). There are tons of YouTube videos on the subject, and it's just waaay too much fun!
I'm not really one to make resolutions, but if I were, I'd vow to make a pile of pearl pieces, and perhaps a few mixed media projects, over the holidays. In addition, I would dust off my neglected sewing machine, and give my beads, a little dose of fibre, for good measure! You see, I love it all, and it saddens me, when my older treasures are neglected. But seriously, I really do need to purge and organize my stash!!!
It's an exciting time of the year, despite the fact that Toronto is having unseasonably mild temperatures (by contrast, the above photo was taking after the ice storm, on December 22nd, 2013). There is, no chance of a white Christmas, but that's not stopping us, from celebrating the spirit of the season. So with that, I'll wish you all a very Merry Christmas, and to those that do not celebrate, a happy and healthy holiday of your choice. Enjoy your time with family and friends, and if you get a chance, try to relax, with a few beads! You've earned it!