We have not abandoned this blog - we just moved to incorporating it on our own site. Continue to stay in touch with us at www.beadfx.com.
😉
Click here to visit ...

Saturday, March 18, 2017
Thursday, November 10, 2016
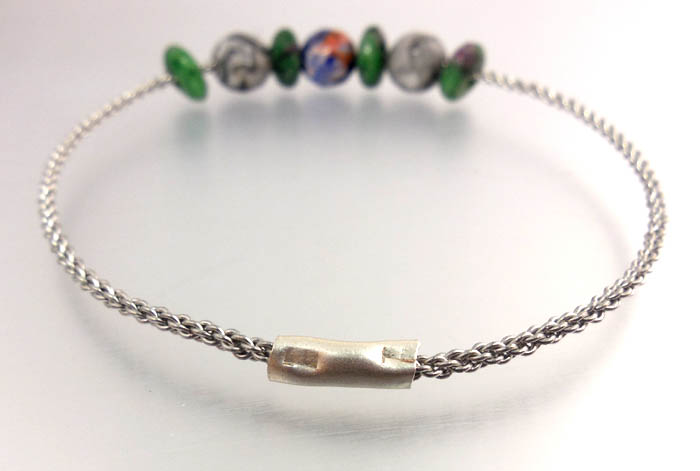
Chain + Metal Beads
Some great new chain this week - chain that will inspire you.
 If you are trying to think what to make for the guy in your life, how about a nice, rugged stainless steel bracelet or neck chain? With matching jumprings and lobster claw clasp, you can put together a very striking look for the person - man or woman - that likes a non-fussy look.
 We also have some really striking chains that are highly decorative. For instance -
 this Fishbone chain - use a short segment as a decorative element with other chains - makes a truly stunning look.
  And this - which I lovingly think of as cheater chain mail, gives you a super look for not a lot of moolah and much less of a time investment - with all due apologies to those who do have the patience for chain maille!
 And this one is my personal fave - the Wheat chain. In two sizes, petite and hefty (3 mm and 5.5 mm) - it is a knock-out all by itself.
 Check out all the new chain here! And look for inspirations coming this weekend that will help you use them!
 We continue to work on reorganizing all the metal findings and beads - based on colour - because that's how you told us you shop, plan, design, organize, sort, and store. This week - we have lots of lovely new Bright Silver beads!
 Gift and Holiday tip! Whether for personal decorating or gifts for the hard to give to - a handmade ornament can be the gift that brings smiles year after year. Use these Snowflake Forms to make pretty ornaments that transcend the holidays!
So check out all the cool new stuff in a cool new website! Bead Happy!
Thursday, November 03, 2016
We're so excited
Two weeks into our new website and we're still excited about it. So many new capabilities. Also - vast amounts of time spent looking for stuff that we're pretty sure should be here somewhere ... . Such is the path of the upgrade!
One of the new capabilities will be to resurrect the monthly survey/prize draw that we used to do! In fact - let's do one now! How this works is, you answer some questions, sign up for our weekly emails if you haven't already (or not, your choice), and at the close of the survey period - we draw one responder at random, and they get a $25 gift certificate to use online! Woohoo! Head over to our survey to give us your opinions on handmade gifts!
Other than that - what is new "stuff"-wise?
 We are very pleased to start offering some of the lovely items from Nunn Designs - in particular - the open bezel frames that are great for resin pendants!
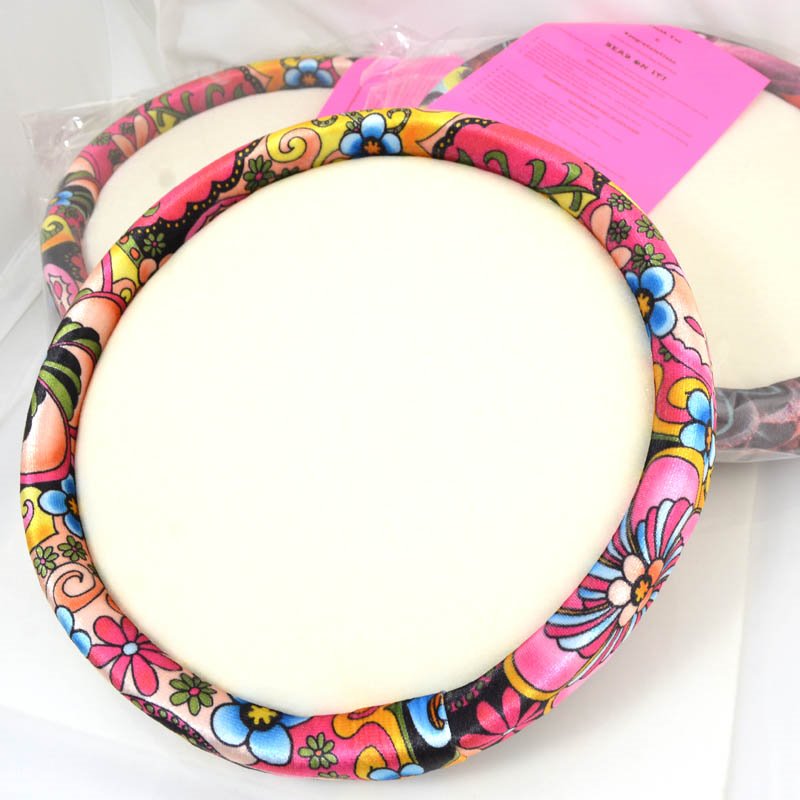 There are also two new sizes of Bead on it Boards - you know - these make great gifts for the beader who apparently has everything. But then, so do gift certificates!
 Also new - a new brand of fine silver metal clay. This is is FYI (For your inspiration!) clay - which is a Canadian brand! We think that you will be very pleased with the pricing!
We also have these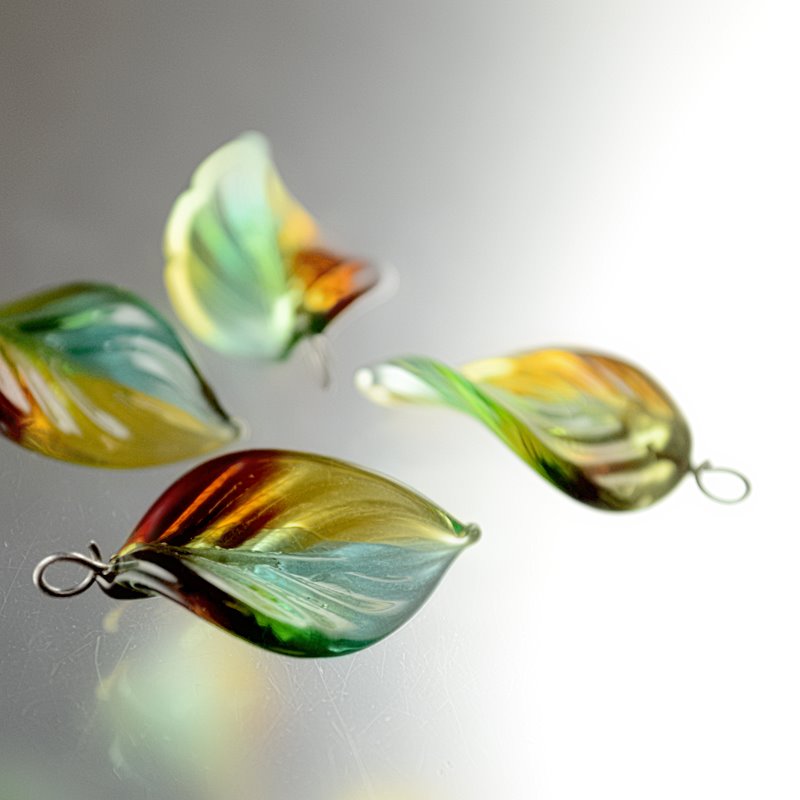 lovely handmade Jewel Leaves that have a real vintage appeal, but are modern made.
We are also in the middle of re-designing how we display the findings and metal beads on the website. In store - we organize it by colour, all the silver together, and all the antiqued silver next to it, and the gold coloured, and the antiqued gold, etc. So we are replicating that on the website. I'd like to say that it is ready to go - but as I write this, there is still a bunch of stuff to do move and re-organize - so I'll probably still be working on it at midnight. ;-)
So check out all the cool new stuff in a cool new website! Bead Happy!
One of the new capabilities will be to resurrect the monthly survey/prize draw that we used to do! In fact - let's do one now! How this works is, you answer some questions, sign up for our weekly emails if you haven't already (or not, your choice), and at the close of the survey period - we draw one responder at random, and they get a $25 gift certificate to use online! Woohoo! Head over to our survey to give us your opinions on handmade gifts!
Other than that - what is new "stuff"-wise?
We are very pleased to start offering some of the lovely items from Nunn Designs - in particular - the open bezel frames that are great for resin pendants! There are also two new sizes of Bead on it Boards - you know - these make great gifts for the beader who apparently has everything. But then, so do gift certificates!Also new - a new brand of fine silver metal clay. This is is FYI (For your inspiration!) clay - which is a Canadian brand! We think that you will be very pleased with the pricing!We also have these
lovely handmade Jewel Leaves that have a real vintage appeal, but are modern made. We are also in the middle of re-designing how we display the findings and metal beads on the website. In store - we organize it by colour, all the silver together, and all the antiqued silver next to it, and the gold coloured, and the antiqued gold, etc. So we are replicating that on the website. I'd like to say that it is ready to go - but as I write this, there is still a bunch of stuff to do move and re-organize - so I'll probably still be working on it at midnight. ;-)
So check out all the cool new stuff in a cool new website! Bead Happy!
Sunday, October 30, 2016
InspirationFX: Say It Like It Is!

Say It Like It Is!
by: Anne Marie Desaulniers
If you have a name, or a simple saying on the tip of your tongue, then this is the bracelet for you! Quick, easy, adaptable, and depending on the components you choose, fairly inexpensive. Perfect for those last minute gifts, to advertise your business, name your children, express your love, mark an occasion, thank your hostess, or even air your frustrations. They'd even be fabulous as party favours! Don't wait! Start your collection now!
Of course, your choice of letters would be your own (search for Tierracast Letter Charms), but I'll list the ones I used (B E A D F X), in the 'Components' section.
Instructions:
1. Add a dab of E6000 Glue to the middle of one Metal Charm - Stepped Bezel (Note: I squeeze a small amount of the glue onto a piece of scrap paper, and apply to charm with a toothpick).
2. Add one SS34 Swarovski Rhinestone to the centre of one Metal Charm - Stepped Bezel.
3. Repeat the above two steps, for the second charm.
4. Wait for glue to dry.
5. Open bracelet, and feed charms onto bracelet, in the sequence of your choice. I chose to add one rhinestone charm, then the letter charms, and finally another rhinestone charm. Of course, your sequence will be personalized, according to the words &/or name(s) you have chosen.
6. You could leave your bracelet at this stage, but when you fasten it, your letters will jumble together. So instead of leaving it at that, I chose to do the following:
7. Take a comfortable length (I chose an arm's length) of the 28-gauge wire (or 26-gauge, if you choose), and start winding it tightly around the bracelet, starting at the loop end. Continue winding until you get about 3/4 of an inch away from your first charm.
8. String on one Swarovski Round, and wind wire around the bracelet (work carefully, as this fine wire does tend to kink. If it does, just straighten out the kink, and continue).
9. Wind wire around bracelet one more time (this leaves a space).
10. Repeat steps 8 and 9, two more times, ending with one wind of the wire, before the first charm.
11. Wind wire around again, but this time, going around the first charm, before finishing the wind.
12. Wind wire around bracelet again.
13. String one Swarovski Round, between each charm (this will help to space them, and keep them apart), with an empty wind of wire at the beginning and the end. Continue until you have reached the end of your letters.
14. Wind wire around the second Metal Charm - Stepped Bezel.
15. Add the remaining three Swarovski Rhinestones, the same way you added the first ones.
16. Adjust the spacing on your wire wraps.
17. Continue wrapping tightly, until you have reached the hook end of your bracelet.
18. When you're satisfied with your wraps, add a small dab of the E6000 Glue, on the bottom of the bracelet, at either end. This will keep the wire from unraveling, and also from slipping off the hook end.
19. Don't worry too much about perfection in your wraps. Just make sure to wrap them as tightly as possible.
Enjoy designing your charming, one-of-a-kind bracelet!


Components
Go to our components list for this project and to buy what you need!Need some help with some of the techniques? Check our tips page.
Thursday, October 27, 2016
New! New! New!
What's new this week? Well, some new SuperDuos, some pinch beads, a new colour of metal clay, some new beading thread, and, oh yeah - the entire website!!!!!
Yes - a new look, that is fresher, cleaner, faster, more streamlined, and easier on the eyes. Easier to use on mobile too! New features like shopping by colour!
\
Of course - as with anything this complicated - there are a few things that seem to be not quite what we expected. So please, if you find something weird, like pictures overlapping or showing up gigantic, or if you can't find something at all! - Please, please don't suffer in silence, just fire us an email and we will track down the bug and beat it to death for you.
Your user id will still work, your saved shopping carts are still there, although if it won't let you log in, clear your cookies, and if that doesn't work, just email us and we'll sort you out.
So if you are into the shaped beads, or the seedbeads or beadweaving, you've might be looking for the Hana thread. Hana is very new to the thread market. Hana is a colorfast, no-ply, strong and pre-waxed nylon beading thread. It’s fray resistant, which makes it perfect for laddering and seed bead weaving.
 Hana thread was created by Midori Matsui - a retired ribbon manufacturer. It is consistent with KO and SONO in terms of quality and can be used interchangeably with them in any project that calls for them. Use with a Size 12 Beading Needle and fuse using an Ultra Thread Zap.
Picture this!
 Picture Jasper and other stone Pendants - wonderful works of art, painted by Nature herself.
  Mother Nature paints these very slowly, mind you - over hundreds of thousands of years. You have to admit though, it's worth the wait!
 And speaking of stone, how about some Kambaba Jasper? This handsome green stone gets my vote for most likely to be misspelled. Kambaba, Kambara, Kabama ... .
Metal Clay!
Prometheus metal clay! If you've been intimidated by the price point of the precious metal clays, then why not give the Prometheus clay a whirl? Price isn't the only thing to love about this clay - it's very forgiving to work as well. We have the new, Sunny Bronze, to add to the colour line-up. And we have classes in metal clay if you are local and want to learn in person. (We're still working on the classes portion of the website, so that part hasn't changed yet - but we're hoping to set it up so you can actually register online! Woohoo!)
 However, if you really do want to use the Silver Clay - we've added the 950 Professional clay. This is a stronger clay, than fine silver and ideal for creating rings, clasps, hinges and other moving parts, and even bangle or cuff bracelets. It cannot be torch-fired, but it can be open-shelf fired without carbon; just place on a regular kiln board or firing blanket. Items made with Art Clay 950 can be hallmarked as Sterling, and have a silver purity of .950 when complete. (Did you know we have a firing service? We will add firing this clay after we've had a chance to test it.)
So check out all the cool new stuff in a cool new website! Bead Happy!
Sunday, October 23, 2016
InspirationFX: Wire Braid Bangle & Necklace

Wire Braid Bangle & Necklace
by: Pam Kearns
First of all, I'm not a wireworker but I see lots of possibilities for the new Artistic Wire Braid and the crimp tubes!
In this set of projects I've created a simple bangle using the 12 gauge Stainless Steel Artistic Wire Braid. I cut the wire using flush cutters to the measurement of the widest part of my hand. The braid is quite stiff but easy to cut. At this point I slipped on a combination of large hole stones. Joining the two ends is quite simple using the tube crimps. Slip the crimp tube so that the one end of wire halfway fills the crimp (you can 'pre-measure' the amount by laying the wire beside the crimp to determine the length and either mark it a sharpie or holding your fingernail in place). Using the ends of crimping pliers (not into the notch), squeeze the tube at one end; the wire will be held in place. Repeat with the other end of the wire into the remaining half of the crimp tube. I then used bracelet bending pliers to create a gentle curve in the crimp tube. The nylon jaws of the pliers will not damage the crimp.
If you don't care for the visibility of the crimp tube, there are ways of covering it. Consider wrapping the tube portion with matching or contrasting wire; covering it with epoxy clay (and adding sparkle with the mica powders); or stitching a small amount of peyote stitch and zipping it around the crimp tube and securing it with glue.
You can get a lot of bangles out of one package of wire braid and crimp tubes. Think about slipping on charms, large hole Swarovski donuts, or beaded beads to really personalize the look.
For the necklace, I created a self-closing 'necklace' using about 19" of the same wire braid. Using round-nose pliers, I created an S-hook with a spiral ending in a vertical plane. I then added some large hole round stone beads, including a small donut onto the wire. To close the necklace, I created another S-hook with a spiral ending in a horizontal plane. The two S-hooks simply hook into each other. Although the wire is already quite stiff, you can gently work harden the wire for more security by tapping the finished ends with a rubber mallet.
The crimp tubes are available in a variety of sizes. Consider also using them to connect thin cording, rubber tubing and more!


Components
Go to our components list for this project and to buy what you need!Need some help with some of the techniques? Check our tips page.
Saturday, October 22, 2016
SPOOK-Tacular Decorations...
We just thought that you would like to see what the ghouls at BeadFX have been up too lately....


 EEEEEEEEEEEEEKKKKKK.......................


Friday, October 21, 2016
25% off Ripple Pip Piggy Tango!
Doesn't that sound like something you might have chanted in the playground while - maybe while skipping rope?
Ripple beads - a flat, circular bead with a rippled profile.
Be inspired by these wonderful samples from Preciosa-Ornela.
Piggy beads - another player in the two-hole shaped bead arena - vying for your attention! The two holes, one in the centre and one off-centre, are 3 mm apart. They can be beaded into a sort of clamshell container for other beads -check this out on Pinterest to see what I mean.
Wedge shaped triangles - two holes running side to side.
Need ideas? Check out these out on Pinterest!
Ripple Pip Piggy Tango
Make your Mother buy a Mango
If she won't then try again
Make her buy a big fat hen
 Sale! 25% off - until Nov 2

Ripple Beads
Be inspired by these wonderful samples from Preciosa-Ornela.
 Pip
Pip

A new "Pip" or seed shaped bead - a flat drop - add texture to your designs!
Be inspired by these wonderful samples from Preciosa-Ornela!
 Piggy
Piggy
Piggy beads - another player in the two-hole shaped bead arena - vying for your attention! The two holes, one in the centre and one off-centre, are 3 mm apart. They can be beaded into a sort of clamshell container for other beads -check this out on Pinterest to see what I mean.
 Tango
Tango
Wedge shaped triangles - two holes running side to side.
Need ideas? Check out these out on Pinterest!
Thursday, October 20, 2016
Big Wire - Big Crimps
New
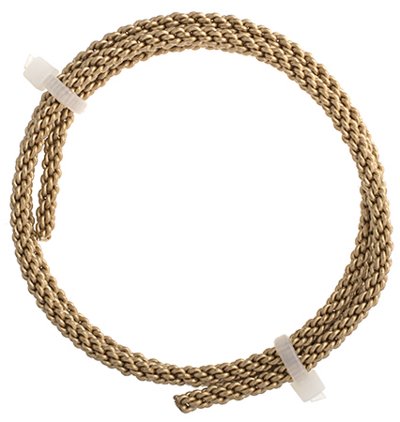 this week, Big Braided Wire, and crimps to join the ends.
Here's a cool idea - you can join the ends of this heavy, braided wire with crimps, to make a bangle bracelet!
It's easy to do - size the wire to fit your wrist - it needs to go over the widest part of your hand - so 9-10 inches, and slide one of these large crimps halfway onto the end, and crimp, and then slide the other end of the wire into the crimp and crimp the other half! Easy peasy. (If you are adding beads or charms onto the wire - do that first, before the final crimping!)

Alternately - you can use crimpable ends (or glueable) and add a toggle clasp, if you are not a fan of bangles.

There is a video here - it takes just seconds to make.
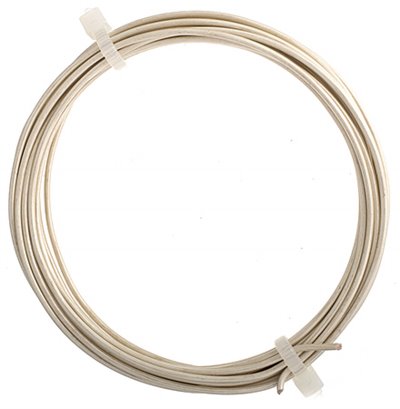
 We have 2 new colours as well in the regular Artistic wire, the Pearl Silver and Iron. The Pearl Silver is a frosty white, and the Iron is close to black. I should point out that the "Iron" is the colour, and it is still a copper wire with a coloured coating.
 Check out all the cool new stuff every week at BeadFX - Bead Happy!
Wednesday, October 19, 2016
A collection of random thoughts!
Every once in a while, the muse needs to step back, reflect, and then deal with all of the random thoughts bombarding her during the day! As the rest of you deal with this as well, perhaps we should discuss some coping mechanisms. Who am I kidding? I have no idea how others cope with life, and I’m certainly not an expert, so I just plan to ramble on until I run out of words!! But isn’t the photo pretty (it's one I took on my river walk)?
 Speaking only for myself, I seem to be all over the place with my art lately! Am I a bead, fibre, or mixed media artist? Why should I categorize myself, if I enjoy what I’m doing? I guess the term “mixed media” probably fits the best, because then I can do basically, anything that I want to do. Is that a fair statement? Perhaps the problem isn’t the terminology, but rather the lack of focus on any one thing. Should that be my focus? Should I focus more on focusing? Should I start to make lists? Would that make me more productive? Who knows??
 One thing I do know, is that lifelong learning is a very important part of my life. My intent is to continue exploring and expanding my art! I get easily bored, and once I master (to the best of my ability) a technique, my muse tells me that it’s time to learn something new. Granted, not always entirely new, but instead, a marriage of both old and new techniques. Take this week, for example! I’ve started working on a new bead embroidery (future class alert!), but my plan is to adapt and execute it, with some ideas I learned in my fibre life. I’m even considering incorporating hand embroidery into the piece, although it is quite small, and I don’t want to “busy up” my palette! I’d love to show it to you, but it’s an ugly stage, so instead I’ll just say that it involves flowers, land and sky. The colours are red, black, and I’m not quite sure about the sky yet!! As always, more to come later! The colours are correct, but the photo has absolutely nothing to do with my embroidery! It's just one I grabbed off Google Images.
 Onwards and upwards to more randomness (and a couple more Google images)! Did you know that right brained people are clutter-holics? Not all of the quotes are clutter related, but here are some of my favourite art and creativity quotes:

 “Creative mess equals creative thought” – Timothy Atwood..........
"To invent you need a good imagination and a pile of junk” – Thomas Edison..........
“Perfectly ordered disorder designed with a helter skelter magnificence” – Emily Carr..........
“Life is a great big canvas and you should throw all the paint you can at it” – Danny Kaye..........
“Art is the only way to run away without leaving home” – Twyla Tharp..........
“One of the advantages of being untidy is that one is constantly making exciting discoveries” – A.A. Milne..........
“Imagination is the air of the mind” – Philip James Bradley..........
“Blessed are the cracked for they shall let in the light” – Unknown..........
“Play is the essential feature in productive thought” – Albert Einstein..........
“He who works with his hands is a labourer. He who works with his hands and his head is a crafter. He who works with his hands and his head and his heart is an artist” – St. Francis of Assisi
“Creative mess equals creative thought” – Timothy Atwood..........
"To invent you need a good imagination and a pile of junk” – Thomas Edison..........
“Perfectly ordered disorder designed with a helter skelter magnificence” – Emily Carr..........
“Life is a great big canvas and you should throw all the paint you can at it” – Danny Kaye..........
“Art is the only way to run away without leaving home” – Twyla Tharp..........
“One of the advantages of being untidy is that one is constantly making exciting discoveries” – A.A. Milne..........
“Imagination is the air of the mind” – Philip James Bradley..........
“Blessed are the cracked for they shall let in the light” – Unknown..........
“Play is the essential feature in productive thought” – Albert Einstein..........
“He who works with his hands is a labourer. He who works with his hands and his head is a crafter. He who works with his hands and his head and his heart is an artist” – St. Francis of Assisi
 Are you ready to reflect, focus and make some small changes in your life? Review your knowledge base of techniques, and then try combining them into something new and exciting. Change is one of the constants in life, and isn’t it time you embraced it?


Subscribe to:
Posts (Atom)