Click here to visit ...

Showing posts with label surgeon's knot. Show all posts

Monday, August 25, 2008

Top Ten Things You Need to Know to Make Jewelry

I saw this in passing in one of the many magazines that are precariously balanced on the edge of the sink in my "reading room." I didn't actually read the article yet - but I started to think, what are those 10 things? I may have to find the article and read it, because I can't come up with 10 things. If I expanded to 10 - you could make every kind of jewelry ever.

So I will go with a shorter list:

The Five Essential Things you Need to Know to Make Jewelry


This, of course, doesn't cover all jewelry ever! - we're talking basic strung necklaces, bracelets and most dangly earrings. This is going to give you a lot to work with.

  1. How to tie a secure knot
  2. How to crimp
  3. How to make a simple loop
  4. How to make a wrapped loop
  5. How to open a jump ring
First up - a secure knot that won't slip out. Gone are the days of stringing on thread or (shudder) "gut." Even "Tigertail" - a huge improvement in it's day, has been supplanted by a modern range of truly delightful products for stringing. Most of these are multi-strand "cables" that are strong, flexible, kink resistant and even come in colours. Most of these new cables are happy to be secured with a crimp bead, but there is still a time and a place for a knot, especially in inexpensive jewelry, like a Sunday afternoon making jewelry with the kids.

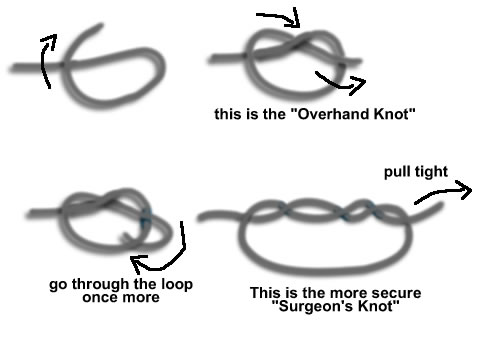
The Surgeon's Knot is the knot of choice for a knot that won't unravel.
You can use this knot to knot to itself, or to knot two threads together.
The classic knot, the overhand knot, is knot that you all will know.
It's a loop and a poke and over and through, and that is the way it should go.

A beefier knot, we all are sure, is to immediately tie another.
We tie a new knot on top of the old, and hope that they work together.

Ah, but it's tricky - this knot on a knot - sometimes they don't get along.
You have to remember that opposites attract, or else the knot will be wrong.

So if you knot with the left over the right, the next must be right over left.
And conversely you see, if it right over left, then left over right it must be.


This give you a knot, a not-a-bad knot, that is known as the knot that is Square.
The feeble old knot, with both sides to match, is knot that we just can not bear.
It's so weak and infirm, it makes us all squirm, it is known as the knot of the Granny.


But a more robust knot, the Surgeon's knot - can be made just one more loop.
This knot has it's charms, you can stitch on old arms! It's strength is something uncanny.


So tie up your thread, your ribbon or bread, and make sure your loops alternate.
And then at the last, don't go so fast, tuck the line through the loop one more time.


Now pull it tight, snug it up right, and have faith that your knot is secure. But make sure at first, that you have it in the right place, 'cuz you surely don't want to undo 'er.

(with my apologies to whomever I just channeled there - Dr. Seuss I think!)

This is an example of how you might use the knot. I have used a crimp bead as a bead for it's look, not to secure the knot.

88827972 Tools - Adhesive -  G-S Hypo-tube Cement -  (1)A little dab of glue can also be used make sure the cut ends of the thread don't fray out. Crazy glue, or our Hypotube cement are excellent for this. Why the heck some resources continue to recommend putting nail polish on knots is beyond me - like we don't have glue? Puhleese!

Next week - Crimping, how to, what to crimp onto, and why.

Tuesday, May 20, 2008

Beading Basics - the Pros and Cons of Stretchy Bracelets

Stretchy bracelets - beads strung on a stretchy, elastic, often clear, beading cord that is knotted. Sounds simple eh? And it is - a quick and easy bracelet - gotta love 'em as a project for kids and tweens. Make 'em by the dozen. No need for fancy measuring - you just need to be more or less in the ballpark - if it's a little small, no worries, the beads just space out a little, and it has to be waaaay to large to fall off, in which case, you can just double it over and wear it as a wrist-strangling double-bracelet.

After making a bunch of these, you might notice you are having troubles with two things - beads with small holes, and the knot slipping. Both are easy to fix.

First, the knot. You might be used to using a regular knot - you know, the old, left-over-right, right-over-left knot. It's called a square knot, for those of you who skipped knot-tying class. It's a good basic knot, but it can be better. (The other knot you might be using is a granny knot, which is left-over-right, left-over-right (no alternating) - and it won't hold hot butter, so don't even go there!)

But, with a little modification, the square knot becomes a surgeon's knot, which is much better for tying off slippery stuff that tends to want to untie itself!


So, after doing the left-over-right part, go through the loop again, and then pull tight. This also works for tying ends together, despite the simplified diagram (which you can click on to see a larger version). And yes, you can do it again for extra safety. And even a third time if you like. Three knots piled on each other is fine, and if that doesn't hold your bracelet, then I respectfully suggest you are abusing it!

Some folks even like to put a little dab of glue on the knot, which is fine. I don't, as it makes a hard lump. I find that a nice little knot tends to pull inside one of the beads and disappears, and I like that a lot! Cut the ends short, but don't cut into the knot! Or the cord. Or yourself.

Now, onto the beads with holes too small - well - here's a suggestion. Pick beads with bigger holes or use a smaller cord. I know that sounds flip, but here's the thing - this is a very easy way to make bracelets, but in getting something easy, you have some limitations. There are multiple sizes of good quality stretchy cord, usually .5 or .7 mm, 1 mm and 2 mm, depending on the brand. And what makes a good quality cord? It stays clear and supple, and the low-grade one's go yellow, lose their stretchiness and snap. Our own selection of stretchy stuff is here.

So you want to pick beads with sizeable holes. Size 6/0 seed beads are great, size 8/0s are fine (I think?). Firepolish and pressed glass are good. Semi-precious stone beads are not - the holes are generally small, and the ends can be sharp enough to wear the stretchy cord and cause breakage. Pearls have way too small a hole.

You can, if you are struggling to get the stretchy thread through the holds, use a wire needle. These needles have a large eye (easy to thread), which squashes down the first time you go through the bead, and hangs onto the beading cord. You can generally re-use them for about 3 bracelets before the eye is so flat you can't use them again, so that's why they are in packs.

What about Crystal beads? How about Lampwork? Metal?

Well - metal you have to watch, if it has a sharp end - you don't want to cut or wear the cord. Lampwork, it's really heavy and can wear the cord - the holes shouldn't be sharp, but they can be rough inside. Crystal, like Swarovski crystal - I'm sorry - but it just looks tacky! I know there are folks out there making Swarovski crystal stretchy bracelets, but to me, a stretchy bracelet is an impermanent thing, a fun spash of colour. It's not an heirloom.

It's not that I don't use stretchy stuff - I do. Like my "Let's Get Daggerous" bracelet. BUT, there is a time and a place, and putting nice crystal, sterling beads and art beads on stretchy cord is just tacky, tacky, tacky!

Of course, that is just my opinion - I could be wrong. ;-)