Saturday, May 31, 2008

A Sneak Peak at the Next Week!

Pssst - hey - wanna know what's coming up? Don't tell anyone I told you!

Squarelets - flat squares that hang like drops - a whole page of 'em, 32 colours, including a bunch of a color effect I haven't seen before called "Silver Glow."

More of those offset lentils too.


And watch for these two next week - I think these are divine - very much a "stone" look. Very organic - I plan on using some with some lampwork beads.

When I have time. HA!

Friday, May 30, 2008

Fusing Fine Silver Wire


I've tried fusing fine silver a few times. First with Danielle Sweeney in our silversmithing classes, and then again with Kate McKinnon last week. This is low tech metalsmithing at it's very best. You can easily do this at home with really minimal tools. Fine silver does not develop what's known as Fire Scale, so you will not require the harsh chemicals that are needed to work with Sterling.


Here's what you need:


Torch (small butane torch which you can get at any hardware store)


Soldering Pad


and some basic wire tools (cutters, pliers)


Since you will be firing you do need adequate ventilation. I would suggest working under your stove with the vent hood on. You won't be running the torch for more than a minute at a time. I also suggest that have on goggles, and make sure that you have a fire extingusher handy!


If you've ever wanted to make your own chains, or links for pendants (lampworkers, you will love this!) you should definately pick up this book, or do a google search for any online instructions.


Here are some simplified, basic instructions for making a jump ring:


Form your wire into a ring around a dowel, or pen/pencil.


Cut using flush cutters


Close your ring as tightly as possible. You do not want any open gaps! The seam should be just barely visible.

Light the torch, and heat your jump ring, focusing the flame near the seam. Move the flame back and forth across the seam. The metal will "flash", and then start to flow. Quickly remove the flame. You're now done!


The ring will be extremely hot. Do not touch it with your fingers! Pick it up with a pair of tweezers, and quench it in a glass of water.


You now have a jump ring. To make a chain, attach a new jump ring onto the one you just made, close it and fuse as above.


Thursday, May 29, 2008

Two weeks with nothing to do?

Lark Books has a call for entry out. - Deadline June 16th!

BEADING WITH METAL BEADS
Proposal Deadline: June 16, 2008
Lark Books seeks designers to make unique projects to feature in an upcoming book, Beading with Metal Beads, scheduled for release in spring 2008. Beading with Cabachons, Beading with Charms, Beading with Crystals, Beading with Filigree, Beading with Gemstones, Beading with Pearls—following these successful Lark titles, now there’s Beading with Metal Beads! Including rings, bracelets, earrings, necklaces, brooches, and more, this 128-page book will be aimed at a broad audience of beginning and intermediate jewelers, beaders, and general crafters. We want to include a variety of metal types, such as copper, brass, and pewter, in addition to silver and gold. The jewelry should showcase metals, from tiny seed beads to large focal beads.
Download Entry Form Here

Wednesday, May 28, 2008

Beyond AB - Other Bead Finishes.

Now that you know what an AB and Matte bead is, let's look at some of the other exotic treatments. Most of these coatings are applied to only one side of the bead, making transparent beads more reflective because of the mirror-like properties of the coating, and making opaque beads more dramatic, sometimes, even making them "reversible" - completely different from one side to the other.

First of all, some of the common, and not so common, bead finishes that you will find on Fire polish and pressed glass beads. Some are common on many colours of beads, and some are on just a few, usually clear.
Azuro is a dark metallic blue coating with flashes of gold along the edges.

Zairit is more purple than blue, and tends to have more gold in it.


Labrador is a silver coating on clear. It is always on clear and so is called Crystal Labrador.


Capri is a coppery colour on one side of the bead, often on clear, (known as Crystal Capri) but not always. Capri is also a colour, but to be confusing, Capri the colour is a deep aqua, and Capri the coating tends to make the clear beads look rather pink.

Marea is a gold tone, sort of brassy. Mostly on clear, (Crystal Marea) - it is occasionally seen on other colours.

That covers firepolish and pressed glass beads, and some machine cut crystal beads. Swarovski has it's own speciality finishes, unique to them, such as Volcano, Heliotrope, etc. They deserve their own page, so I'll cover them in another article! Seedbeads also have their own terminology, and I'll cover those separately too!

Tuesday, May 27, 2008

Bead Finishes: Aurora Borealis is AB


AB Iris Matte Rainbow Azuro Zairit Volcano Capri
What the heck are all these terms? Sounds like a magical incantation more than anything else!

Well, as you know, there is a lot of magic in beads, but in this case - we are talking about bead "finishes" - which is a treatment to "modify" the existing colour. It is a light coating that is applied to the bead as part of the manufacturing process, and is very durable. The coating application is pretty high-tech, usually involving high temperatures and evaporating salts, and not really a reproducible home process.

By the way, when we refer to a bead being "coated" - these are NOT what we are referring to - coated beads implied a coating that may come off with wear - we note these so that you are aware of this and can plan accordingly when you use them, usually avoiding high friction applications. (I.e. bracelets, which get a lot of abuse.)

We think of these finishes as modifiers, and some of them can be combined, and some not.

Probably the first, most familiar and oldest of these is the AB finish - AB is short for Aurora Borealis. Daniel Swarovski developed this coating for Christian Dior in 1955 - and Swarovski hasn't looked back since! This delightful coating effect is similar to the iridescence you would see on a soap bubble, and is most dramatic on large, clear beads - reflecting so much colour that you often can't tell that the original bead has no colour at all! Sometimes, this makes for confusing pictures online - video would show it better, but I don't think the world is quite ready for an online streaming video catalogue of 10,000 bead and jewellery items!

The colours that reflect tend to change depending on the angle you are viewing the bead from, the background colour (i.e. on skin, black clothing, white shirt, etc.), and the surrounding colours in the jewellery. For instance, I find that Crystal AB picks up the colours of other beads better than does the Crystal (clear) colour by itself. It also added more "fire" - which is flashes of reflected colour, so items made with Crystal AB included tend to be more dramatic.

AB is not restricted to Crystal AB (which is the AB finish on clear bead) but can be applied to any colour of glass, including opaque colours, such as black, for a very different look.

AB can be combined with a Matte Finish - which is a soft, non-glossy finish. Matte beads have a wonderfully tactile effect - they just beg to be touched. Because they are not glossy, they add a depth to a creation that is hard to get any other way as well! The transparent colours, when matted, have a soft glow that is also just delightful!

For comparison, here we see daggers in Montana Blue, Montana Blue AB, and Montana Blue Matte AB.
Tomorrow: Beyond AB - some of the other bead finishes.

Monday, May 26, 2008

Birdsnest Rings

Every now and again I teach a basic wire wrapped ring class called "Birdsnest Rings". This is a fairly simple project, and once you get the hang of it, you'll be whipping these out like crazy. Trust me, all of your friends will want one!


Materials required:

  • 22 gauge Artistic Wire, or 22 gauge dead soft sterling silver wire Fabulous assortment of Swarovski, or semi precious beads
  • Wire cutters, and flat, or chain nose pliers
  • Ring Mandrel
  • Ring Sizer
  • Needle File
  • Coated flat nose pliers (optimal)

Instructions:

Cut a length of wire to 2.5 feet long, and gently straighten your wire with your fingers, or by using a coated pair of flat nose pliers.

Find the centre point of the wire and bend slightly to mark the spot (do not kink the wire!). Thread on your focal bead, and centre on the wire.

Place the bead on the centre of the wire face up on the ring mandrel and hold it down. Wrap each end of the wire around the mandrel once or twice. These wraps will determine how many strands of wire form your ring shank.

While still holding onto your bead firmly, wrap each end of wire to bend around the bead in the centre. This will now hold your ring in place and you can loosen your grip somewhat. Keep wrapping each end one at a time until you have built up your “nest”. How many wraps is completely up to you. Generally, your chosen focal bead will dictate how many wraps you need to make.

Once your “birdnest” is complete, slide the ring off the ring mandrel. You should still have a good 6 + inches of wire left on each end.

Starting on one side, wrap the end of the wire around the shank wires tightly being careful to wrap evenly. The wraps should fit snugly next to each other with no gaps. Complete 5 to 7 wraps.

Repeat the above for the other side of the wire. Once you have your wraps lying evenly, cut off the extra wire. Using your flat or chain nose pliers, press the wire into the shank.

If you have any sharp burrs on your wire, use a needle file to file down and clean the end of the wire.

©beadFX Inc. 2007

Sunday, May 25, 2008

Cool Beady Site

Just dashing out the door, but wanted to share this cool beady site I found: www.bead-media.com
Down to earth, detailed advice and stories - I particularly like the Fussy Opinions section - it's entirely possible that I harbour a few fussy opinions of my own on the topic of beads (well, on a few topics, actually!)

Cheers!

Saturday, May 24, 2008

Organization

As some of you may know, I'm really not known for my organization skills. My desk is a perpetual disaster zone, and everything I touch becomes an unorganized mess. However, every now and again the lack of order drives me into a frenzied organizing clean up day. I can feel that moment coming on. :-)

I really want to tackle my jewelry. As a beader, lampworker, and metal clay addict, I've accumulated a "lot" of jewellery. Most of which I never wear, but it always wonder - If I had it organized and close to hand, would I wear it? So my question is to you blog readers - How do you organize your finished works? Do you just dump them all in a jewellery box? Or do you have a section in your closet for them? I'd love to hear your ideas. I was thinking of making some sort of frame to hang on the wall. Instead of putting up prints, I could have frame after frame of lampwork beads and jewellery! - If you'd like to share your ideas, please post in the comments below.

It's All in a Name

I love the internet - sometimes it seems like all of human knowledge is out there, waiting to be picked, like an apple tree loaded with apples - far more than you can consume!

For instance - last weekend I bought, despite my determination not to, some more perennial plants. More plants means more digging and gardening and I have quite a few, so I'm trying to enjoy the ones I have for a bit. But, there it was, this spectacular tree peony, with a blowsy white flower the size of a dinner plate and crinkly petals so thin you can see through them and overall, so opulent that it reminded me of some decorators' artificial tissue paper flower. It had a $60 price tag and a label that said it was a tree peony and a bar code. No information on how to grow it or where to plant it! No point in asking the staff at this particular garden centre either, as they are all young, enthusiastic, and so inexperienced they barely known to get the root end of the plant in the dirt.

So, home I go, and google "tree peony growing conditions" - and I get, with the first website, the skinny on where to plant them, when, (actually, the fall :-( hmmm) , type of soil, how dry or wet, etc. Everything on one page about how to grow peonies like a pro.

The next page I look at is even more fun! It has Chinese Tree Peonies for sale - with names like "A White Crane Standing in the Snow" and "Black Dragon Holds a Splendid Flower" and "Green Dragon in a Pink Pool" - How fabulous is that? Named by someone after my own heart!

You know you have really got something going when you are making something - a necklace or a bead or any other handmade creation - and you suddenly know it has a name. It just pops into your head what it is called!

Sometimes you start with a name, and it inspires your creativity - you think of this and that and what it evokes, and bingo - you have an idea and you're off. Somewhere between here and there, it might change names, but that's cool too - part of the creative process.

Or, like when we are selecting names for some of the glass beads for the store - you select a name to evoke how it looks, or makes you feel, or the memories and thoughts it brings.

A rose by any other name might smell as sweet - but I know that a tree peony called "Flying Swallow in a Red Dress" will get my attention first! Next time you are in a creative slump - google "tree peony" and then try making something inspired by their names. I know I have a "Green Dragon Lying in an Ink Pool" in me somewhere!

Friday, May 23, 2008

Destructive Testing

We got in some new leaf shapes, and they are very cool: large, but light. One of the things that concerned me, though, is that I was a little worried that they were fragile, that they might bend and break or tear.

We certainly don't want to be selling items that are easily broken or destroyed, for the same reason that we don't want to use them! If you're going to make the effort to use something, the least it can do it last! I mean, really!

So, I selected a leaf at random to be my victim! I started at the top, near the hole, to try and break it. I noticed a faint crackling noise, which worried me. I folded the leaf back and forth, flexing the metal, and torn it - ripping the two halves away from each other. I finally got it to start to tear, but it didn't go far - and I had to go and get wire cutters to actually get inside!

Once in, I found the source of the crackling noise - the original leaf! The process of electroplating organic items (like a leaf or a bug) or non-metallic items (like a glass bead) involves painting a metallic conductive paint on the item - and then putting it in a conductive solution with the metal that you want to plate on to it, and running a low voltage current through it for several hours. (I know this all because I took a class on electroplating beads - which we intend to offer again, so if you are interested in signing up for this class - do let us know!)

The leaf, of course, is now seriously dried up, and will crackle a little, inside it's metallic armor. Of course, it lends absolutely no structural strength to the leaf, so the crackling is no indication of weakness - and will stop once it gets all broken up.

I was quite gratified to see how strong these are - no worries about their durability! You can even bend them a little to refine the shape if you wish!

I'm sure you are re-leafed to know this. ;-) (Sorry - can't resist a leaf pun.)

Thursday, May 22, 2008

Please Re-Leave Me!

Please Re-Leave Me!

We got leaves for you this week - all kinda leaves.

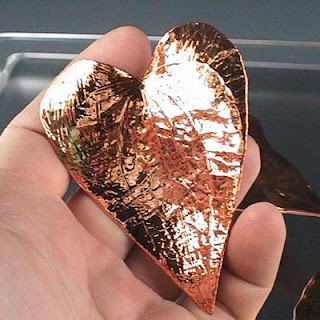
s16685 Plated Leaves - Medium Hart Ivy Leaf - Bright Copper (1)Plated Leaves - these very cool plated leaves in Sterling silver and Copper are actual, electroplated leaves - so no two are identical. If you bend them, you might hear the leaf cracking inside, but don't worry, it's not about to fall apart, the leaf inside is dried out, but not part of the structural strength. I even tore one open to find out! They are tough!

s16696 Findings - Clasp - Toggle -  Anthurium - Bright Copper (1)Maybe you'd like leaf-themed clasp for your creation, try this lovely copper clasp!

s16706 Sterling Charm/Pendant - 1.5 inch Dancing in the Wind Leaf - Antiqued Sterling (1)But, wait, there's more! Cast sterling leaves - a pendant perhaps? s16717 Sterling Charm/Pendant - 19 mm Birch Leaf - Sterling (1)

Or smaller perhaps? Perfect for earrings or charms!

Or, how about this fine Maple Leafy looking clasp? This is Sterling Silver Gunmetal - that is Sterling Silver with a Gunmetal finish (Gunmetal is usually applied over brass or white metal.) The result is a very dark and gothic look - quite different from our usual antique sterling.

Copper Pebbles, Nuggets and Boulders.

s16691 Sterling Beads -  Carved Boulders - Bright Copper (1)Remember when we got these in Sterling? I thought they were divine, and now we have them in bright copper. Actually, we have 4 sizes of these random, organic rock-inspired shapes, ranging from petite to humungous. I can so picture these teamed up with some turquoise! Mmmmmm.

Kazuri

s16499 African Handmade Ceramic Beads -  Flat Disc - Cape of Good Hope (1)Bless You! Actually, Kazuri isn't a sneeze - it the handmade-in-Africa ceramic beads. We have some new ones, as well as restock on some of the existing ones! These sleek, colourful beads are mighty appealling!

Magnetic Hook Clasp

s16707 Sterling - Magnetic Hook Clasp -  Medallion Flower - Sterling (1)Now here's a different style of clasp! This one has a fold out hook, that stays closed by virtue of a magnet! Easy and secure! Kewel, eh?

CreativeFX - New Kits

s16730 CreativeFX -  Inspirational Colour Challenge Bead Kit - Sue Sees Citruss16729 CreativeFX -  Inspirational Colour Challenge Bead Kit - Darjeeling SunsetThe new kits are now available, with two riotous new colourways!

On Sale this Week

Rhinestones - Chaton Rose (Flatbacks) - without glue, and Hot Fix (with heat activated glue, for fabric, etc.) This week only, 10% off.

Cheers! As always, there are lots more cool new items, so look for the New tags!

Wednesday, May 21, 2008

New Swarovski Stuff

This summer's new colour from Swarovski was Mocca and new items in that colourway arrived today: 4mm bicones, 2 sizes of donuts, big 10mm rounds and pendant drops.

Also picked up more colours of the 3-branch coral pendants. These will go nicely with the sterling coral pieces that we stock. One last item is several more colours of the new Swarovski pendant butterflies. Oh, and I almost forgot the new brown Swarovski pearls in 4, 6, 8 and 10mm. Nice colour - like melted dark chocolate.

These will be showing up on the BeadFX website as soon as they are photographed and processed.

Kate McKinnon Classes

Well, Kate's now gone back home. What an incredible 5 days. I didn't get a chance to post yesterday due to sheer exhaustion. She is by far the best instructor I have ever come across. Kate has a saturation style of teaching. She freely gives up everything she knows. No secrets. If you ever have a chance to take a class from her (and we do hope to bring her back next year) ... sign up, it is worth every penny and then some.

All of the students in the class were itching to try out all of the new ideas and ways of working. I've still got a couple kiln loads of metal clay to fire. For those of you who took the class, I should have it all done by tomorrow.

Sorry, I don't have any more photo's at the moment, but a few of the students took some, and I'll post them as soon as I have them.

Make It Yourself: Wire Needle

Yesterday, I mentioned "wire needles" for stringing. I thought I'd mention that you can make your own.

Wire needles are good for getting stuff into small places. They are sort of disposable, in that the eye of the needle crushes down when you go through the first bead, and thats what holds whatever you are stringing in the needle. For instance, you are trying to thread some eyelash yarn (that fluffy stuff) into some beads and you know darn well it will fit in the bead, if you can only get the yarn into the bead. You can't get the yarn into a regular needle - you need a much larger eye! Here is your pefect solution - make your own needle.

Use a light gauge wire - depending on the size of the bead hole you are aiming for - but even a 30 gauge (really small) wire will work. Pretty much whatever you have on hand will work - but I don't suggest using sterling silver or gold-filled, unless you are made of money.

  1. Cut a piece about 6 inches long, and loop it in half.
  2. Slip a pencil or pen into the loop.
  3. Hold the two cut ends, with your fingers if you are strong, or with a pair of pliers if you are normal. Hold them close together.
  4. Rotate the pen around, spinning it like a handle to make the wire twist. Twist it up tight. You will see it twist up into your needle.
  5. Take the pencil out before the "eye" gets so small that you can't.
  6. Trim the cut ends so that you don't have a little fork (unless you want to make forks!)

And there's your needle!

Cheers!

Tuesday, May 20, 2008

Beading Basics - the Pros and Cons of Stretchy Bracelets

Stretchy bracelets - beads strung on a stretchy, elastic, often clear, beading cord that is knotted. Sounds simple eh? And it is - a quick and easy bracelet - gotta love 'em as a project for kids and tweens. Make 'em by the dozen. No need for fancy measuring - you just need to be more or less in the ballpark - if it's a little small, no worries, the beads just space out a little, and it has to be waaaay to large to fall off, in which case, you can just double it over and wear it as a wrist-strangling double-bracelet.

After making a bunch of these, you might notice you are having troubles with two things - beads with small holes, and the knot slipping. Both are easy to fix.

First, the knot. You might be used to using a regular knot - you know, the old, left-over-right, right-over-left knot. It's called a square knot, for those of you who skipped knot-tying class. It's a good basic knot, but it can be better. (The other knot you might be using is a granny knot, which is left-over-right, left-over-right (no alternating) - and it won't hold hot butter, so don't even go there!)

But, with a little modification, the square knot becomes a surgeon's knot, which is much better for tying off slippery stuff that tends to want to untie itself!


So, after doing the left-over-right part, go through the loop again, and then pull tight. This also works for tying ends together, despite the simplified diagram (which you can click on to see a larger version). And yes, you can do it again for extra safety. And even a third time if you like. Three knots piled on each other is fine, and if that doesn't hold your bracelet, then I respectfully suggest you are abusing it!

Some folks even like to put a little dab of glue on the knot, which is fine. I don't, as it makes a hard lump. I find that a nice little knot tends to pull inside one of the beads and disappears, and I like that a lot! Cut the ends short, but don't cut into the knot! Or the cord. Or yourself.

Now, onto the beads with holes too small - well - here's a suggestion. Pick beads with bigger holes or use a smaller cord. I know that sounds flip, but here's the thing - this is a very easy way to make bracelets, but in getting something easy, you have some limitations. There are multiple sizes of good quality stretchy cord, usually .5 or .7 mm, 1 mm and 2 mm, depending on the brand. And what makes a good quality cord? It stays clear and supple, and the low-grade one's go yellow, lose their stretchiness and snap. Our own selection of stretchy stuff is here.

So you want to pick beads with sizeable holes. Size 6/0 seed beads are great, size 8/0s are fine (I think?). Firepolish and pressed glass are good. Semi-precious stone beads are not - the holes are generally small, and the ends can be sharp enough to wear the stretchy cord and cause breakage. Pearls have way too small a hole.

You can, if you are struggling to get the stretchy thread through the holds, use a wire needle. These needles have a large eye (easy to thread), which squashes down the first time you go through the bead, and hangs onto the beading cord. You can generally re-use them for about 3 bracelets before the eye is so flat you can't use them again, so that's why they are in packs.

What about Crystal beads? How about Lampwork? Metal?

Well - metal you have to watch, if it has a sharp end - you don't want to cut or wear the cord. Lampwork, it's really heavy and can wear the cord - the holes shouldn't be sharp, but they can be rough inside. Crystal, like Swarovski crystal - I'm sorry - but it just looks tacky! I know there are folks out there making Swarovski crystal stretchy bracelets, but to me, a stretchy bracelet is an impermanent thing, a fun spash of colour. It's not an heirloom.

It's not that I don't use stretchy stuff - I do. Like my "Let's Get Daggerous" bracelet. BUT, there is a time and a place, and putting nice crystal, sterling beads and art beads on stretchy cord is just tacky, tacky, tacky!

Of course, that is just my opinion - I could be wrong. ;-)

Sunday, May 18, 2008

Ring class, and Shag Carpet of Pearls

It's been a whirlwind the last couple of days. Yesterday, we finished up the second day of our ring class. We not only made rings, but also little houses to wear as pendants. I can't belive the creativity coming out of this class. Everyone made absolutely incredible pieces.


By the end of the class, we were all completely exhausted. I didn't get a chance to post last night, as yesterday turned into a 12 hour plus day! By the time I got home, I was way too tired to post.
I don't think I've ever fallen asleep so quickly. I barely made it in the door and up to bed :)


Here's some pics from the ring class:


Today was a nice change of pace as we were doing stitching rather than metal clay. It was nice to be able to sit around, bead and chat. We of course were making her awesome Shag Carpet of Pearls, which is probably her most famous signature piece. Again, we were all hooked in, and all eight of us were busy planning on what other colourways and combinations of beads to make them in next. Unfortunately, I forgot my camera today.

I'll be sure to remember it for tomorrow. It'll be another busy day as we have another completely full class. Then we'll have to get her packed up for home and the Bead and Button show in Milwaukee. I'll post more on Tuesday after I've caught up on some sleep.

nite!

Saturday, May 17, 2008

Kate McKinnon - Day 2 - Ring Class

We're all just buzzing around here. Kate makes these classes so incredibly fun. Every one is busy thinking and designing little cities (yes, cityscape rings!), ways of colouring, resin inserts, and of course trying to decide which of our beads or cabs are going to be mounted in these rings. We've all made 4 or 5 rings, along with a few more today. Our first batch was fired last night, and I'll be unloading the kiln in an hour or so....speaking of which, I just woke up - I really should get off the computer and start getting ready. The coffee hasn't kicked in yet though.
More tonight!

Friday, May 16, 2008

I love my dog but . ..

Don't get me wrong - I adore my dogs, but $1.8 million for a doggy diamond collar? I'm sure you can make something just as nice with crystals that won't leave you tearing your hair out when your beloved scratches it off and hides it under the couch.

Now here's a site where the artist is celebrating dogs by making beaded images of dogs, in the form of little pouches/purses. I particularly like the way that she has extended the dog's face off the square of the pattern in many cases - truly thinking outside the box. (Link to the rest of the site: Maddie the Cat Beaded Jewelry - also has patterns for sale, but as I've never tried one, I offer no opinion on them.)

If the rain has you stuck inside this weekend - dashing out between rain squalls to plant your petunias - maybe try these 3-D beaded dogs? Maybe a nice beaded Chihuahua or Schnauzer to hang off your purse? Then, you too can have a "purse dog!"

Cheers!

Thursday, May 15, 2008

Kate McKinnon - Day 1 Toggle Class

Whew! What a day. I have to say, Kate is probably the most engaging instructor I have ever come across. There were 12 of us in the toggle class today, and our heads are just swimming with ideas. We should have named the class toggles, and everything else you can think of. We covered clasps, rivoting, rings, chains....Probably more besides! I was really inspired by Kate's method of keeping the parts simple, and building structure and architecture with many cohesive elements. Today I worked on some clasps, headpins, and I've got a spinner ring on the workbench to finish up tomorrow.


Tomorrow and Saturday is all rings. We've got a 2 day class to fully explore rings in all their glory. I'll be bringing in some glass frit, resin, and paint for those who want to add some colour to their pieces.


Here are a few pics from the class today. Unfortunately, I didn't get a shot of the first batch of kiln fired goodies. We did have a bit of a kiln issue today. We made A LOT of stuff, and we really tried our best to keep things grouped together, but I think a few pieces got confused with other folks pieces. I'm sure we'll sort it all out today. Of course, we all made the same kind of stuff, and although I had heaps of textures available, the wallpaper textures from Hadar Jacobsen were a favourite. So picture this, 2 shelves completely jam packed with bars and rings of similar shapes and all the same textures....sigh.


Woohoo! Bulk Swarovski 4 mm Bicones!


Woohoo! This is the OTHER thing I was working on until the wee hours - getting these ready to go! We can now offer factory original packages of 4 mm Swarovski bicones at bulk prices. There are 10 gross in a package - that 1,440 (there's a nice round number for you. Tell me again what you have against the metric system?) beads in a package. All sealed and stickered and with the official Swarovski hologram on it.

The packaging is kind of fun - from another age really. It is a folded paper packet that resembles a package of diamonds. We suggest that you open your first one over a table - although we know that you are eager to rip into it. Just bear in mind that you don't want to spill them all over heck's half acre. Refolding the package is only possible if you have a degree in map folding - but don't worry about it - you're going to want to just stare at them any way!

Business discounts, frequent beader points, bead society discounts and/or free shipping do apply to these. (Which is different from when they were a special order item.) We might not have them readily in stock - so you might have to wait a few extra days for your order. If you are ordering other items and want them processed and shipped right away, please order them separately!

Late Start this AM

Late start this morning - late night last night. The update to the database that makes the website work happens at midnight, and in any normal company, it would all be automatic - but no one has ever accused us of being normal - so some of it is done manually, by me, at midnight. It means that I not only need to be awake, which I usually am, but on the ball as well - which is optional for most people at midnight.

Jen will be reporting on the progress of the classes over the weekend - she's very excited about these Kate McKinnon classes. Today's is full, but if you're not opening the cottage this weekend - maybe you want to see if you can get into one of the other classes? The Jewellery Design class looks might tempting!

A friend sent me a link to this site: Bruno's Art Tour. Check it out! I just love the idea of have statues hidden in the garden, and not those nasty concrete garden centre gnomes either. I'd fill my garden up with sculptures if I ever found any I liked at prices I could afford!


Swarovski - New Colour

A new colour from Swarovski - a warm dark ale colour, a rich brown transparent chestnut that gleams with the richness of polished wood. Try this with copper pearls or gold findings. Very nice.

Kate McKinnon

s16490 Book -  Structured Metal Clay - by Kate McKinnonKate McKinnon will be here, teaching this week, and we are very pleased to also be able to offer her book on working with metal clay.

s16493 Book -  Silver Wire Fusing - By Liz JonesActually, we have a number of new books - for instance, this new book on fine silver fusing. If you are fascinated and intimidated by the thought of silver soldering, then you may find that silver fusing - that uses fine silver instead of sterling - may appeal to you a great deal.

s16492 Book -  Designing Jewelry with Glass Beads - By Stephanie SersichAnd for those that are fascinated with those bunchy, bushy glass bead bracelets, or for those that took Stephanie Sersich's class and now can't find their notes! - we have her new book with, yes, instructions for her "Spiny Knotted Bracelet," among others!

Drusy Cabochons

Drusy is quartz crystals that occur on the surface of stones, often found inside geodes - those hollow "thunder eggs" that can be split open to reveal their treasures inside. These have been flashed with a metallic coating at high temperature to make them look spectactular and other-worldly.

On Sale this Week

Copper! Copper Bright, Copper Antiqued. Solid Copper, Copper plated. Copper findings and copper beads. We have a wide selection of copper, because we think it's really cool! This week only, 10% off.

Bloggin' It

We've added a blog to our website (which, you may have figured out, as you are now reading it!) We done this before when we were doing the renovations - but then they were done and we stopped. Now, we're going to be keeping you in the loop on a daily basis, online (so you don't get daily emails from us.) Set beadfx.com to be your home page in your browser and check us out every day! Writing will be split amongst a number of us here, sometimes with Jen writing, sometimes moi, and sometimes our buyer or Erin or whoever has something to say.

CreativeFX Winners

Congratulations to the winners of the CreativeFX challenge:

  • Betsy L for Botticelli's Palette
  • Tina B for Moonlit Garden

The Botticelli's Palette sure spoke to a lot of you - and I was very impressed that we got our first non-jewellery submission - check out Amy's beautiful art doll submission! Remember folks, it doesn't have to be jewellery!

New colourways coming soon!

67802249 Bugles - #4 Twisted Bugles - Silver Lined Crystal (20 grams) - Clearance - End of Line! 30% off!Discontinuing the Czech Bugles

We are discontining the Czech-made bugle beads - although we will continue to carry and expand our line of Japanese bugles. Consequently, the bugles are now discounted 30% until we have sold them out. Check them out on our discontinued page!

Congratulations New ACS Level 1

Congratulations to Rosemary and the other students that took the Art Clay Level 1 Certification class. Rosemary told me that she had to work really hard to get her certification as she kept breaking stuff in the class and having to repair it. She is now confident that she can fix anything! This sounds exactly like what Jen went through when she was certified! There is always a silver-lining - in this case, it is a pure Silver Art Clay lining!

Cheers! As always - look for the New tags!

Wednesday, May 14, 2008

Kazuri beads - back in stock

Just a quick note - the Kazuri beads - the ceramic African-made beads - we have a new shipment, and some are restock - so they will be available again on the site after midnight on Wednesday when the database refreshes. The page looks sorta sad right now. :-(

The new ones from the shipment will be up in a week or so.

Sneak Peek at Next Week

Here's a sneak look at what is coming up in next week's update - if everything stays on track! I'm currently processing a lot of metal - including these honking big leaves. Despite the size, they are very light - and there is a single hole at the top. I'm sure lots of people will want one for a pendant. I, of course, can picture a bunch of them on a chain with lampwork beads, like a leafy garland with glass fruit! We'll have a couple of sizes, and silver as well as copper.

Speaking of sneak peeks - I found out yesterday that I know a former spy! How cool is that? Just corporate espionage, but still ... . Hint - when you get an email to your business along the lines of "Hi, I'm a student doing a project on ---- and I'd like more information about your business" - you might want to think twice before handing out information. Said former spy says that the real issue with being a spy is trying to figure out what to put on your resume after. Wonder what James Bond's resume says? International Relations Coordinator? VP of Product Development and Testing?

Tuesday, May 13, 2008

Contrasting Colours

This morning's stroll around the garden - which I do every morning when I let the dogs out because if I don't go with them, the blankety-blank puppy jumps the fence into the neighbor's yard! - anyway - this morning's stroll got me thinking about colour contrasts. First of all - there was a cardinal - way down the yard, but glowing like a beacon - bright red feathers on an emerald green background. Next was a goldfinch - I think. Mother used to call them flying dandelions. He was cavorting in the red leaves of the crabapple, not quite bloomed yet, but ready to pop any day now. And, as I was going back inside - the flash of a bluejay, a sapphire shock to the senses.

These strong colours out of place, so to speak, got me thinking about one of my two favourite elements of design - in this case - contrast. (The other is repetition.) I love strong contrast in my designs - you don't see a lot of monochromatic work from me. It's turquoise and red, or black and a jeweltone or cream and turquoise or some strong contrast. If I don't get the contrast in the jewelry, I make it with the clothing I wear it over, a red dragon bead over a black t-shirt, etc. In fact, my wardrobe is largely black - I am merely a walking jewelry display unit.

Speaking of displays of jewelry - check out this site - bijouxbead.com. This designer frequently shops at beadfx - and lo - that is, in fact, one of my beads as the centrepiece of that fabulous necklace on the front page! I'm truly flattered that my beads are being used in such handsome and fabulous creations.

I can speak for all of us at beadfx when I say it's a great thrill to see the work that others have done and know that we had a little part in inspiring it: whether it is a handmade component, a strand of commercial beads, or just recognizing someone wearing a necklace that we taught them how to attach the clasp. Just making the world a beadier place, one bead at a time.

Monday, May 12, 2008

Playing with gold


These are some sample pieces made after Suzanne McNenly's photopolymer metal clay class. The gold used is 22k gold paint, and much more accessible to purchase than gold clay. It comes in a super tiny little bottle, but you can paint quite a few pieces with it.
Use the gold on fired, unburnished metal clay (still white), paint on 2 to 3 layers, and re fire with a torch. I particularly love the look once the whole piece has been brushed with a brass brush. It gives it a nice soft satin finish. - I now want to make everything two tone :-)

So, Kate Mckinnon arrives later tonight. I'm really looking forward to a week full of classes with her. In preparation for her coming, we decided to clean up the classroom a wee bit. On the backdoor of the classroom, there were some legacy broken mirror tiles from the previous tenant. We've been meaning to get rid of them for - oh, a couple years now. It was going to be a nasty job, so I kept putting it off.

I finally pulled them down on Saturday night, only to discover that the door was originally painted black, and of course was now plastered with tacky tape stuff to hold on all those mirrors. I managed to get most of the goo off with goo gone, but some of the sticky stuff remained. By this time, I was getting pretty tired, and decided to h*** with it, and painted the door anyway. I managed to get one coat on (it needs about 10!) - this is when we of course knocked over the paint can, and spilled the entire can on the floor of the hallway out back. Of course, I only bought the one can, so we had to get down on the floor and try to save the paint by picking it up with spoons :-) - It was really too bad we didn't have the camera with us.

Welcome Monday

It rained last night, and this morning, the air smells wonderful! Stepping outside and taking a deep breath of fresh air that smells great is a wonderful thing, and let me tell you, in Toronto, it's astoundingly rare. For someone who lives, as I do, backed onto one of the busiest highways in the country, it's astonishing. Worth writing home about, even.

The garden is looking amazing - we are still a week away from being frost free - technically - and the garden is so far advanced it's a little scary. The cherry tree is done - not that it had a good year, and the apple is about to bloom. The irises are showing colour, and so are my tulips. Despite the fact that I bought tulips labelled "early" - mine are just starting to show some colour, and my neighbor has had his open for a week - his are big, showy yellow tulips that practically waist high - stunning!

I didn't get to make beads first thing yesterday, but I did get to it eventually - a lot of production stuff and some experimenting, and I did remember to set the kiln last night, so they are all done this morning. Now to soak them, pull them off the mandrels, and clean them.

Onto the day's work - shooting stuff for the site. I am so seriously backlogged, I hardly know where to start. Somewhere in the boxes of stuff there are some metal leaves that are showing up in fashion magazines, so I'm going to try and start there and get them ready before they are so last Tuesday. Then, we'll see.

Sunday, May 11, 2008

Ooops


Drat! I left the kiln on last night - that means only one thing. I have to make beads this morning to justify leaving the kiln on all day! (If I set it to anneal now - I still won't have the beads until this evening anyway, so - they might as well stay in there. ) That's just sad - having to sit down at the torch and make beads first thing on a Sunday. Truly tragic. ;-)

Check out this parure (jewellery set) - I finished the bracelet yest. morn while waiting for a kiln firing for some painted glass beads that I'm working on. I put them on a new background, which looks nice, but the focus is not quite perfect - so I'll have to re-shoot these - I guess the camera needs a coffee first thing too.

The amazing dragon pendant has a neat little story. This spring, some of my friends were down in Tucson (for the big spring bead and gem shows) - and S____thought she'd try and find me a dragon. Hard to find me one I don't have, these days. But as she was wandering around, she got lost, and found herself outside an antique store, away from the usual vendors of the gem shows. In she went, and lo!, she found this dragon - isn't he perfect? I'm not sure what the base he is mounted on is, it actually appears to have been something before the dragon was added, as there is an old carving on it that is mostly obscured by the dragon on top. He is sooooo awesome.

The Turq. beads are the 12 mm beads that we sold out of almost immediately - I snagged a strand for myself, and you can see that I would have used more in the bracelet if I'd had more! But they match perfectly the turquoise that is inlaid into the pendant for colour. The turq in the pendant doesn't have the high polish of the beads, leading me to suspect that it might be real unaltered turq. Especially if it is old. Thanks again S____ - I LOVE this dragon! He is soooo gorgeous!

The big sterling balls are new - look for them on the site, hmmm - I think they are in this week's update - I love 'em - I predict they will be hot! The bead caps next to the "ivory" spacers - in reality, my own handmade lampwork beads in ivory glass, and lightly etched - a look I love! - the bead caps are awesome with lampwork and I think they will be hot and fly out the door too. Also coming up this week, I think.

The earrings - this Victorian Fan headpin and two of these new flower bead caps - maybe they aren't in this update, cuz I can't think what I called them - are my new best friends. Headpin, beadcap, bead, beadcap. Wrap, earring finding. Wham, bam, thank you ma'am! And - they really flatter my face. I'm having a hard time with earrings these days - still mourning the lost of the ankh that I wore for the last 17 years, dammit. Which is why I'm wearing posts with studs, euro-wires or shepherds hooks with a plastic stopper. Losing that one really made me crazy. (For those that don't know - I have worn a silver ankh earring on one ear and silver stud in the other for as long as anyone has known me. This spring, I lost the ankh while out at dinner - while tugging a necklace off over my head to show someone, I think. Anyway - retracing steps and calling the restaurant revealed nothing. It seems crazy to feel bad about something like a little piece of jewellery - but - well, it was important to me. )