Tuesday, April 30, 2013

Get to know...Amy Waldman-Smith


This is our second installment of BeadFX's Instructor Profiles - getting to know our instructors a little beyond the classroom or studio setting.

BeadFX and her students know Amy Waldman-Smith as an inspiring instructor. The world knows Amy as an accomplished lampwork artist, acclaimed teacher and contributor to various magazines including Glass Line Magazine, The Flow Magazine, 1000 Glass Beads, and numerous others. She is also the current Regional Director for Canada for the International Society of Glass Beadmakers (ISGB). 
When describing herself, Amy states, “I am a lampworker, or flameworker.  I make handmade glass beads in an open flame.  I do make jewellery with my own beads, but my strongest skills are in actually making the beads.  I sometimes do wirework and stringing of my work. I also do some tubular crochet work with seed beads, she says. “ This is a challenging technique to learn – give me a challenge and I have a hard time walking away!  I had to figure it out.  I occasionally teach crochet at BeadFX, but mostly I make plain crocheted necklaces for my glass beads.”
Primarily self-taught, Amy’s work is an evolution. “I generally do not work on projects, but a body of work,” says Amy. “The current focus of my glasswork is footprints. The footprints we leave behind in each and everything we do and say.  The footprints of glass that can be manipulated, stretched or pushed.  Each influences the elements surrounding it.  One footprint pushes the next, but never supplants it.  It’s a metaphor for living.”

Her inspiration comes from many sources. “The world is full of inspiration – nature: flowers, branches of trees in the winter, the patterns in the sand at the beach, stones, pottery, the colour of the sky just before it gets dark.  I could go on and on,” says Amy. 
Amy began her lampworking career in 2001 with an initial class with Lezlie Winemaker to learn the basics of lampworking. Since then, Amy honed her skills at the BeadFX lampworking studio.  Now you’ll find her at her home studio in Richmond Hill – when she isn’t travelling to teach!

Teaching has become a way of life for Amy. In addition to BeadFX, her upcoming class locations include the Craft Guild of Dallas in Texas; the Southeastern Michigan Glass Beadmakers Guild in Toledo, Ohio; at the Bead and Button Show, Milwaukee, Wisconsin; and The Studio of The Corning Museum of Glass, Corning, New York. What is the best part of teaching? “The light in their eyes when I see that they too have fallen in love with the glass (or that they have really been able to conquer bead crochet),” says Amy.
What is Amy’s advice to others who create? “Stick with it and say yes to all the interesting things that come your way – you just never know where they will lead you.”

Amy's upcoming classes at BeadFX:
Two-Day Lampworking Weekend - Part B
Saturday, June 22 (10:00am - 2:30pm)
Sunday, June 23 (11:30am - 4:00pm)
This two-day weekend class is designed for students who have taken an introductory lampworking class and are ready for more.  This is a follow up class to our weekend lampworking classes.  The topics covered will be mainly student led.  We will work on the areas you are having difficulties with or feel you are ready to try for the first time. This class is eight hours of instruction and topics can include such things as stringers, flowers, hollow beads, shaping, encasing, sculptural beads (ie frogs and birds) and more. The beads you make in class will be kiln-annealed and will be available for pick-up the following day. If you are from out of town, we are happy to mail them to you at no extra charge.

Intro to Lampworking Weekend
Saturday, July 20 (10:00am - 2:30pm)
Sunday, July 21 (11:30am - 4:00pm)

This two-day weekend class is designed for beginners.  This class will introduce you to the wonderful world of making lampworked or flameworked beads.  Practice is an essential ingredient in working with glass. The class is eight hours of instruction and torch-time allowing significantly more practice time than the 5 hour class. Topics covered include:
  1. Overview of the equipment and tools, safety information and studio protocols. Setting up a home studio is also discussed.
  2. Types of glass
  3. Making Glass Beads
Students usually make about 8-20 beads, depending on their aptitude. The beads you make in class will be kiln-annealed and will be available for pick-up the following day. If you are from out of town, we are happy to mail them to you at no extra charge.

For complete information about the classes, go to our website and click on 'classes'.To register, please call BeadFX at (416) 751-1911.

Monday, April 29, 2013

InspirationFX -- Nouveau Kephri


by: Rochelle Kilmer

Kephri was the ancient Egyptian scarab god - a god of the sun, who was responsible for the forces that moved the sun across the sky each day.

This updated homage to the power of the beetle combines pyrite and turquoise to good effect to evoke the ancient feeling of Egypt's treasures.

This necklace is 18.5 inches without the chain extender, and 20.5 inches with.

Cute approx 22 inches of softflex for one side of this asymmetrical necklace, and approx 14 inches for the other side.

  • Take a wire guardian and move it to the center of the shorter piece of softflex
  • Using both strands, string approx 6.25 - 6.5 inches of pyrite nuggets.
  • Use a crimp end with loop to secure, and trim the excess ends. As we appear to be temporarily out of these as I write this - you could also use a crimp and a crimp cover. Or, use a wire guardian at each end. In this case, don't double up the wire when stringing.
  • repeat for the second side, adding the spikes and turquoise
    • the pattern is: wire guardian, 4 pyrite, 1 turq coin, 3 pyrite, 1 spike, 4 pyrite, 1 coin, 3 pyrite, 1 spike, 3 pyrite, 1 coin, 3 pyrite, 1 spike, and finish with approx 3 inches of pyrite. 
  • again, finish with the crimp end with loop.
  • add the extender and lobster claw, using jumprings.
  • attach the focal beetle, again, using jumprings.
Enjoy!


Components

Go to our components list for this project and to buy what you need!
Need some help with some of the techniques? Check our tips page.

Saturday, April 27, 2013

The Business Chat - 10 truths

1. It’s hard. It gets easier.

Make friends in the community, talking about it makes it easier. Sharing information makes it easier. Just knowing that other people are doing what you are doing makes it easier. Acknowledge that sometimes things are hard. Suck it up
2. People want to hear your story, the magic behind your art. Tell your story, why do you make what you do?

I thought my story was kind of weird, it is actually. But weird in a good way, and weird in a way that sets me apart. It makes me who I am. It’s important to know your own story and tell your customers.
3. You can’t please everybody
 Don’t bother trying. Some people just aren’t going to get what you do and it’s a waste of time trying to make them care. Those who care are your target audience, your right people. Focus on them and ignore the rest.
 4. Make things that you like, that fit in with your other work.
Don’t make things just because you think they will sell. They won’t. 
  5. Set your own roadmap to success instead of blindly following someone else.
Know why you are doing what you are doing. What do you want from your micro business? This is YOUR life, YOUR business, what exactly is your idea of success? Define YOUR goals.
 6. Consistency is key.
Whether it’s blog posts, email newsletter, attending craft shows, doing tasks on a consistent basis is critical for success. For some crafters, consistency means every day, for others it may mean every week or every month. One-off or inconsistent activities will get you inconsistent results. Nothing works if you keep changing your mind. Stop doubting yourself and your decisions, pick something, believe in it, and go for it. 100%.
7.  You will make mistakes.
Don’t beat yourself up because you goofed up, it is part of the process. Figure out what went wrong and don’t do it again. Get over it.
 8. Say this to yourself everyday, “I am an artist. I make art.”
It is important to own the words.

9.     9.  Say this to yourself everyday, “I am a manufacturer. I am a maker. I make product.”
It is not crass to sell your work. You are sharing your gift with the world. And if you don’t sell your work you do not have a business.
 10.  It is totally worth it.

Thursday, April 25, 2013

You are growing sleepy ...

27780101015209 Swarovski Elements Bead - 14 mm Becharmed Pave (8010) - Rose (1)
You are feeling relaxed and calm. You can barely keep your eyes open. You are ... Becharmed. Dazzled by these Swarovski Pave beads, ... you feel warm and soft and ready to drift away to your happy place.

27780301015327 Swarovski Elements Bead - 10.5 mm Becharmed Pave (8030) - Indian Siam (1)And if fat little donut-y beads encrusted with rhinestones aren't enough to make you swoon, we have - Cylindrical beads paved with rhinestones! Mmmm - dreamy! Both of these are part of the Swarovski "Becharmed" beads collection - which are the large hole beads that fit onto the Euro-style bracelet - Troll, Pandora, et al.

These beads are made by Swarovski - they have a stainless steel core for durability and scratch resistance, and are stamped with the Swarovski name. The stones are embedded in a colour-coordinated epoxy made by Swarovski expressly for this purpose - which we will soon be carrying! Woohoo!

You are feeling warm and relaxed ...

 
s29758 Stone Beads - 12 mm Big Hole Rondelle Donut - Malachite (Simulated) (1)You are thinking of pleasant things - like green trees and donuts ... Green donuts even - and a green donut - even if it isn't St. Patrick's Day - can still be a pleasant thing - when it is a Malachite Donut! A number of new stone donut rondelles this week - and these have larger-than-average holes. Not big enough for a euro-style charm bracelet - like the Becharmed beads, but big enough for a 2 mm cord, leather, satin, ... whathaveyou ... ?

You are floating, soaring ... flying through the sky ...

s35752 Glass - 9 mm Asteroids - Turquoise Opal Picasso (15)Blazing across the heavens even - like a shooting star or an ... asteroid! More of these wonderful, funky, chunky, hunky, lunky firepolish asteroid beads. They have a wonderful antique look and their irregular shape and interesting finishes make them definitely not your every day bead!

You feel smooth and dreamy ...

s35766 Glass Pearls - 12 mm Round - Winter Mix (8 inch strand)Like a pearl! A big pearl! A big, 12 mm round Fashion Pearl. These glass pearls come on a short, 8 inch strand - with a lovely tassel on the end - which is purely decorative and not really anything to do with the pearls - but just fun!

So, now that you have been hypnotized by the beads - you are powerless to resist their charms. We have lots of choices to feed your addiction and make you happy, so click on a link or an image above, or just go here for all the wonderful new beads this week!

Tuesday, April 23, 2013

May Blooms with a Bouquet of New Classes

Forget May flowers - there are lots of new May classes that will get your creative juices flowing! By the way -- remember Mother's Day is coming up on Sunday, May 12. Consider a special gift from you to your mom with a class! Gift certificates are available in any denomination you wish or sign her up directly by calling the store and registering her.

In addition to some favourite returning classes, here are all the new projects and techniques that will be taught in May:

Textured Herringbone
Saturday, May 4
9:30am - 12:30pm
Instructor: Maria Rypan
At first glance it looks like a braided soutache trim, but it’s really rich lush hex, seed and bugle beads beadwoven with a single needle and Fireline® into a modern vintage classic. Maria’s unique off-loom version has some twists and turns. See the transformation before your eyes as you bead along! The textured Herringbone makes a great strap for a pendant because of its unique chevron in richly colored hex, bugle and seed beads. Choose your favorite pendant from a Converter Kit collection of fluorite slices. No two are the same courtesy of Mother Nature.

Three Exquisite Pairs of Earrings: Intro to Chainmaille #2
Sunday, May 12
9:30 - 12:30pm
Instructor: Marilyn Gardiner
Marilyn continues her intro to chainmaille series! The ancient art of chain mail is all about weaving metal rings into interesting patterns. Come and expand your earring collection—while trying out a fascinating jewellery-making technique. You will learn three new chain mail weaves that you can use to make bracelets or necklaces in the future. This second class has patterns that are a wee bit more difficult, but still easy: Triple Knot Earring, Scherzo Earrings, and Japanese Flower Earrings.

Celtic Labyrinth Bracelet
Sunday, May 12
1:30 - 4:30pm
Instructor: Marilyn Gardiner
An out-of-the-ordinary bracelet! You’ll love these square mazes that lay flat & link together to make a design that only looks complex. Make it with either Argentium™ sterling or with Jeweller’s Bronze rings.

Double Strand Pearl Knotted Bracelet
Tuesday, May 14
6:00 - 9:00pm
Instructor: Rae Huggins
In this class the main focus will be on the ancient art of pearl knotting using pearls to create a double knotted bracelet that you can wear at the end of the class. During this class there'll be demonstrations using tweezers, an awl, and pearl knotting pliers. I’ll also demonstrate how to ream pearls using two types of bead reamers.

Box Style Knotted Bracelet
Thursday, May 16
6:00 - 9:00pm
Instructor: Angela Peace
Make an elegant box style bracelet using an easy to learn knot technique. The bracelet can be finished with a sliding closure or metal findings and clasp. You will find lots of applications for this new knot which when knotted without beads, produces a round cord suitable for use with pendants and beads with larger holes.

Wire Crochet Rings
Friday, May 17
5:30 - 8:30pm
Instructor: Giovanna Paz
Giovanna is a brand new instructor to BeadFX and brings an amazing wire crochet technique! Using 28gauge wire, a crochet hook and a simple pattern and a hammer, students will create an beautiful wire ring.

Discovering Tubular Herringbone
Thursday, May 23
6:00 - 9:00
Instructor: Pamela Kearns
It’s soft and supple – and very easy to do! Using two-hole twin beads, you will learn how to make tubular herringbone spiral to create a slinky bracelet. Once that is complete, you'll learn how to make a beaded bead using the twin beads to slide onto the bracelet.

For complete information and details about all May classes, go to www.beadfx.com; click on classes and events; click on May. 

PLUS BeadFX will be at the
Toronto Bead Society's Spring Bead Fair
Saturday, May 25; 10:00 - 5:00pm
Sunday, May 26; 11:00 - 5:00pm
Toronto Reference Library
Appel Salon, 2nd Floor
789 Yonge Street (north of Bloor at Yonge)
Drop by the store to pick up a TBS Spring Bead Fair postcard to give you $2 off the admission price.

Monday, April 22, 2013

Mermaids Choice


by: Dwyn Tomlinson

This fish leather is super handsome, once you get over the "Fish Leather? Really?" feeling. Actually - feeling is what it is about - because this feels like any other leather, smooth and warm, and smells like any other leather too.

If you need some help with the how-to - check out my detailed blog post on gluing leather onto a brass cuff base, and finishing the inside nicely with ultra suede.


Components

Go to our components list for this project and to buy what you need!
Need some help with some of the techniques? Check our tips page.

Techniques: Making a Leather-Covered Cuff Bracelet

It's easy to make a very handsome and professional looking leather covered cuff bracelet. They are comfy and stylish, and you can wear them plain or embellish them to taste. Make a wide, statement cuff, or a series of mix and match narrower ones. (These are 1.5 inches wide.)

You will need a brass cuff bracelet base, your leather to cover the outside, and a piece of ultrasuede to finish the inside and glue to hold it all together. I used our new FISH LEATHER for these examples!

You will also need, sandpaper or an emery board to rough up the brass cuff for gluing, a cheap paint brush for applying the glue, and some elastic bands or some scrap wire, and some sturdy drinking glasses, and some plastic wrap or plastic bags. Clothes pegs or binder clips come in handy too. (Read through the instructions before starting to see how the glasses are used, and it will give you a better idea of which ones to select from your cupboard.)

For glue - I have used Gorilla Glue - which is a gel cyanoacrylate (a thick version of super glue or "crazy"(tm) glue) and Gem Tac with equal success.

This is going to be a multi-step process. The key with this is to NOT try to glue it all at once and get a big gooey mess - but to glue it in stages, and let one step dry before starting the next.

 First, check that your piece of leather is going to be large enough. You will need some to wrap over the sides. I did not find it necessary to trim this fish leather at all - I used the 1.5 inch bracelet blank. Mark it so that you know where to position it when you start gluing.


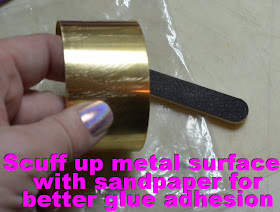
Take some sandpaper or an emery board and lightly sand the outside and the inside of the bracelet blank. This will roughen it up and make for better glue adhesion. Wash and dry the blank carefully.

 Apply the glue to the outside ONLY of the bracelet blank, and line up the leather, and position it. Do NOT fold over the edges yet. Secure with elastic bands or wire, and allow to dry completely.

 Next, you are going to fold the leather over the edges and glue it. Cut into the leather at the curved ends so that the leather will lay flat when you fold it over. Apply glue to the inside of the cuff, more or less matching how far over the leather will reach.
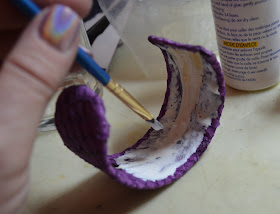
 Place a plastic bag or some plastic wrap over a sturdy drinking glass (the straighter the sides, the better, for even pressure), and put the cuff bracelet over this. This will put pressure on the inside and hold the leather in place will the glue is drying. The plastic stops the bracelet from gluing to the glass in the event of leakage.

 Once the glue has dried, check the corners to see if they all glued down nicely. If not, you may have to add a bit more glue, clamp and wait for it to dry again.
 Now, apply glue to the entire inside - and add the ultra suede. Don't worry about shaping the ends yet.

 Again, wedge over a drinking glass and secure with wire and/or elastics - until it dries. (I was living dangerously here - no plastic. But I was also pretty careful with the glue for this stage.)

 Trim the ultrasuede up to the edge of the curve with a pair of sharp scissors.

 The finished bracelet! 


For this embellished version, (see second picture at the top) I glued a piece of WireLuxe woven wire to the outside, and wrapped it over the edges BEFORE gluing on the ultrasuede liner.


Look for all these components and supplies on our website!

Saturday, April 20, 2013

The Business Chat - what to do when you're rejected


It arrives.

The envelope.

From the show you applied to.

You hold it, wondering, am I in or am I out? Do they want me?

With bated breath you open it….

“Dear applicant,
We regret to inform you…”

Damn. Crap. Argh. You’ve been rejected.

Don’t feel bad, we’ve all been there and still are there sometimes. You might assume that as a professional crafter with 10 years’ experience and hundreds of craft shows on my resume that I’m in a show automatically. But no, there is no guarantee. I’m sitting here waiting to hear from three new shows that I’ve applied to, my fingers are crossed. Even some shows that I have done for years may reject me.

There are a variety of reasons that lead to a rejection. The most common reason is that your category is full. Within each category there are also sub-categories. An example is the jewelry category, the first to always fill up. If a show has 20 spots for jewelry, you don’t want all the jewelry to be the same. The organizer might allow 3 lampwork artists, 4 silversmiths, 4 goldsmiths, 3 fiber or leather jewellers, and 6 assemblers. The organizers will also look at price points ensuring that there are a variety of choices for customers.

Returning vendors are usually given priority as well, meaning that even if your category has 20 spots, there may only be 3 or 4 available to new vendors.

The second most common reason for rejection is that your photos or your application sucks. 

Your application is the only thing an organizer has to judge you upon. Do you look like a professional? Remember, the organizer is in the business of selling space and ensuring that the customer has a good shopping experience. They need to know that you are going to show up, have a nice booth, and make decent work that is appropriate for the show.

Make sure your application looks as professional as possible. Spell check. Your photos must be the best that you can get. In these days of cheap digital cameras there is no excuse for bad photos. If your photos need a little help, there are some awesome free photo editing tools and applications (hello picmonkey.com!).  Spend some quality time getting to know your camera and practising. Photography is a skill and can be the difference in getting into a show or not. If an organizer tells you that your photos were not great, then spend the next year making them great.

You could also be rejected because your work isn’t appropriate for the show. If you make lower priced work and you’ve applied to a higher end show it isn’t going to work. Trust the organizers judgement on this.

Here’s a couple of suggestions for you.

First, call the organizer and ask why you were rejected. Ask what you can do to improve your chances to get into the show next year. Not only will this provide you with constructive criticism but you will have shown the organizer that you are serious enough about your business to improve it. It’s a great way to begin a relationship with the organizer.  

Second, check the cancellation date. This is usually listed on the application (and you made note of it then, right?) Life happens and someone is bound to cancel from the show. Don’t call on the cancellation date, call the organizer the day after. Although the organizer will have a list of alternative vendors, if you take the initiative and call before they have to go searching for someone you just might get in.

I do know of some vendors who just show up on the day of the show and hope there will be an empty space. Believe it or not, sometimes vendors who have paid for a show do not show up. This is a bit of a gamble and I can’t say that I’ve done it, however it has worked for people I know.

If these suggestions don’t get you into the show then the best thing you can do is shrug it off. They rejected your presence at the show, not you. Go to the show as a shopper and take a look around. Picture yourself there as a vendor, now go home, make new work, take new photos and try another show.

Friday, April 19, 2013

InspirationFX!


YAY! 

I finally got our inspirations page working again! We have hundreds of free projects on our site - designs that you can use to make your own, or use as an inspiration for your own, unique design. 

Sterling Swing


by: Rae Huggins
Here's a fun and swingy pair of earrings from Rae. Customize them by using a different colour crystal - just about any colour would look awesome!


Components


Go to our components list for this project and to buy what you need!

Need some help with some of the techniques? Check our tips page.

Thursday, April 18, 2013

Fishing for Compliments

75135101-09 Leather -  Second Skin Fish Leather - Suede Fuschia (1)
OK - I freely admit - my first reaction to the phrase "Fish Leather" was "You've got to be joking. Seriously?"

But there it was - a big pile of it, and the colours were pretty cool, so I figured that it wasn't fair to judge it without actually trying it.

So - first off - it absolutely does not smell or feel like fish. It does, in fact, smell 75135100-04 Leather -  Second Skin Fish Leather - Glossy Chocolate (1)and feel like leather. Really nice leather, actually. If no one had said "Fish Leather" - I'm not sure I would have guessed - well - other than the pieces are shaped somewhat like the side of a fish.

It's soft, supple, and quite strong. It doesn't have scales - where the scales are removed, you can see the prominent "scale pockets" - and that's what makes up the pattern on it.

This fish leather - think of it as the Mermaid's choice! - is made from farmed Brazilian Tilapia and is a by-product of the food-fish industry - those Tilapia steaks that you get at the restaurant? - well - this is them. The dyes are natural, vegetable dyes, and overall - this is a very eco-friendly product!

It comes in Suede and Glossy, and a rainbow of colours - some of which are sold out already! - and a single piece is big enough to make a very nice cuff bracelet - just glue it onto a brass bracelet base and you are good to go.

So - anyway - what with all the hot new leather products, this is worth looking at - Fish Leather. Much cooler than you would have thought. Give it a whirl!
34760280021001 Swarovski Elements - 8 mm Pendant Oval (6028) - Crystal Vitrail Light (1)
34760280045001 Swarovski Elements - 10 mm Pendant Oval (6028) - Crystal AB (1)
 

More of the new Swarovski Pendant Ovals coming in - now we have colors, and, of course, Crystal AB! 34760280070379 Swarovski Elements - 12 mm Pendant Oval (6028) - Indicolite (1)


s35714 Glass -  Micks Lips - Periwinkle (1)s35724 Glass Flowers - 9 x 5 mm Duckfoot Flowers - Canary (1)And we have more of the interesting pressed glass shapes that we started on last week. For instance - these party dress / bell shape flowers got the "lips like Jagger." And the duckfoot flowers, always popular - now come in a bright Canary Yellow and Apricot. Not often that you find a vivid yellow glass - but we're seeing more of it with the bright neon colours in the spring fashion trends.

s35737 Pressed Glass - 20 mm Flame Coins - Desert Blooms (1)s35751 Glass Daggers - 5 x 16 mm Dagger Beads - Dark Ivory (25)And we have some very funky pressed glass coins with interesting "carved" shapes on them, and these really quite wonderful "Ivory" daggers. Don't see much in this colour either, and I can't think why not, it's elegant and understated and truly classic!


So, lots of choices for new things to try, so click on a link or an image above, or just go here for all the wonderful new beads this week!